HAProxyLB Keepalived Setup for Percona Cluster HA
- 27 Feb 2023
- 3 Minutes to read
-
Print
-
DarkLight
-
PDF
HAProxyLB Keepalived Setup for Percona Cluster HA
- Updated on 27 Feb 2023
- 3 Minutes to read
-
Print
-
DarkLight
-
PDF
Article summary
Did you find this summary helpful?
Thank you for your feedback
Implementing load balancer solutions for MySQL high availability by integrating it with Keepalived, HAProxy. The following are the actions associated with Keepalived, HAProxy, and VIP.
- Keepalived: It uses a Linux virtual server (LVS) to perform load balancing and failover tasks.
- HAProxy: It performs load balancing and high-availability services to TCP and HTTP applications.
- VIP: Virtual IP addresses (or VIPs) allows you to use multiple IPs on a single physical network interface.
Information:
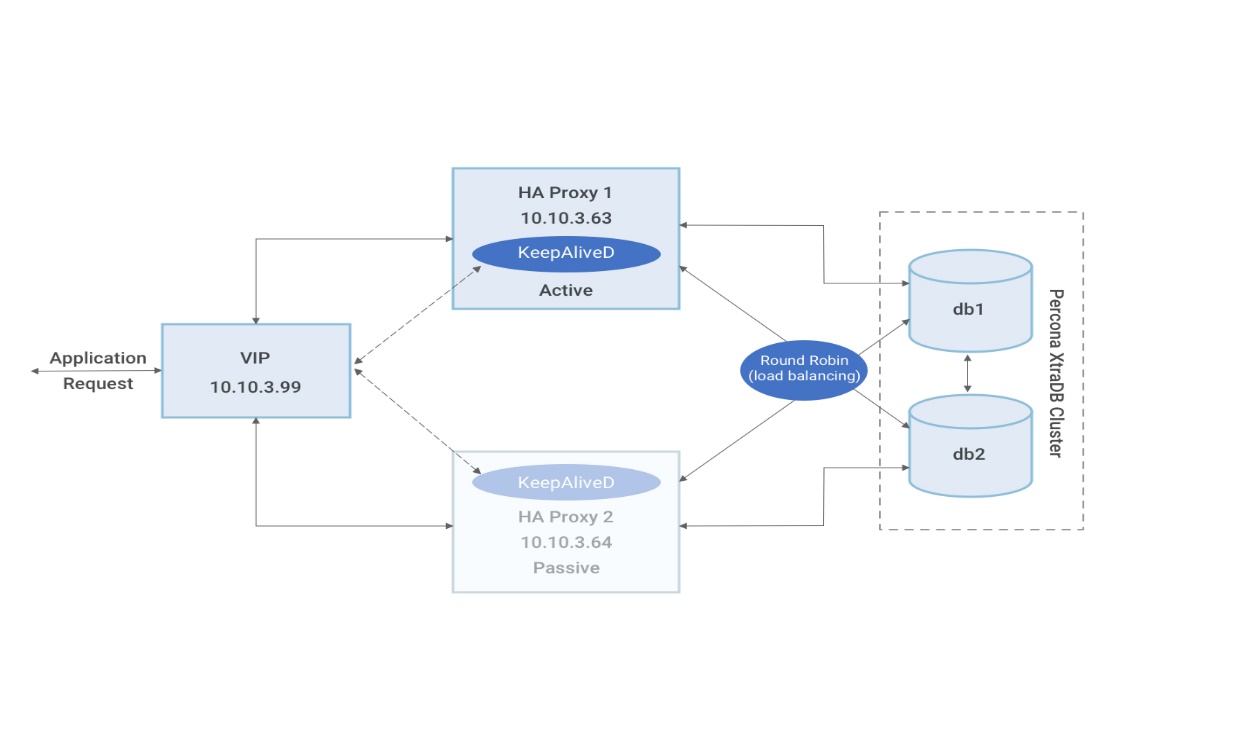
MySQL Percona Xtradb Cluster is configured with Keepalived and HAProxy in 2-Nodes. The following are two nodes:
MySQL Percona Xtradb Cluster is configured with Keepalived and HAProxy in 2-Nodes. The following are two nodes:
- Node1: 10.10.3.63 (Percona-Cluster + Keepalived + HAProxy-Master-LB1)
- Node2: 10.10.3.64 (Percona-Cluster + Keepalived + HAProxy-Backup-LB2)
- VIP (Floating IP): 10.10.3.99 (Ensure this IP is available with subnet)
- OS: Cent7.x
Architecture Design
The following illustrates the Architecture design:
To allow HAProxy to bind to the shared IP address, you need to add the following line to /etc/sysctl.conf:
Information:
You require admin privileges to perform this as these are system core files.
vi /etc/sysctl.conf (at EOF, add below the line)
net.ipv4.ip_nonlocal_bind=1
Save and close the file, and run the following command:
sysctl -p
Install and Configure Keepalived on both LB-Nodes
The following are the steps to install and configure Keepalived on both LB Nodes:
- Install Keepalived using the following command:
yum install keepalived - Verify the first ethernet/wireless interface using the following command For Example, eth0, eth1, wlp6s0 wlp6s1
ip a - Start the keepalived service
systemctl start keepalived.service - Enable keepalived service to run on boot. systemctl enable keepalived. servic
Node-1: Master Server-LB1-Configurations
To configure Master ServerLB1:
- Go to keepalived configuration directory:
cd /etc/keepalived/ - Back up the original keepalived file
mv keepalived.conf keepalived.conf.bak - Create a new keepalived configuration file and add the following details:
nano keepalived.conf
Configuration file for keepalived
vrrp_instance V1_1 {
state MASTER
interface eth0
virtual_router_id 51
priority 101
advert_int 1
authentication {
auth_type bigboss
}
virtual_ipaddress {
dev eth0 label eth0:1
}
# track_script {
# chk_haproxy
# }
}
Information:
Alter the virtual IP.
- Restart the keepalived service:
systemctl restart keepalived.service - Verify the status of the Keepalived service:
service keepalived status - Verify whether the virtual IP address is either assigned or not assigned using the following command:
ip a
Node-2: Backup Server-LB2-Configurations
To configure backup server LB2:
- Go to keepalived configuration directory:
cd /etc/keepalived/ - Backup the original keepalived file:
mv keepalived.conf keepalived.conf.bak - Create a new keepalived configuration file and add the following details:
nano keepalived.conf
Configuration file for keepalived
vrrp_instance V1_1 {
state BACKUP
interface eth0
virtual_router_id 51
priority 100
advert_int 1
authentication {
auth_type bigboss
auth_pass passw0rd
}
virtual_ipaddress {
10.10.3.99 dev eth0 label eth0:1
}
#track_script {
chk_haproxy
# }
}
Information:
Alter the virtual IP of yours
- Restart the keepalived service:
systemctl restart keepalived.service - Verify the status of keepalived service:
service keepalived status
Information:
Now perform one round of testing by stopping Master-Node keepalived.service and verify whether the VIP gets switched to Backup-Node.
Install and Configure HAProxy on both LB-Nodes
1. To install and configure HAProxy on both LB Nodes:
2. Use the following command to install the HAProxy service:
yum install haproxy
3. Go to the HAProxy configuration directory:
cd /etc/haproxy
4. Backup original HAProxy configuration file:
mv haproxy.cfg haproxy.cfg.bak
5. Create a new haproxy configuration file and add the following details:
nano haproxy.cfg
global
log 127.0.0.1 local0
log 127.0.0.1 local1 notice
daemon
maxconn 4096
user haproxy
group haproxy
defaults
log global
mode http
option tcplog
option dontlognull
retries 3
maxconn 2000
timeout connect 3000
timeout server 50000
timeout client 50000
listen stats
bind 10.10.3.99:80
stats enable
stats hide-version
stats uri /stats
stats refresh 10s
stats auth statadmin:statadminpass
listen mysql-cluster
bind 10.10.3.99:5306
mode tcp
option tcp-check
balance roundrobin
server node-1 10.10.3.63:3306 check
server node-2 10.10.3.64:3306 check
Note:
Here the bind address is the virtual IP, and we are adding port 5306 to listen to server node-1 and server node-2 are Percona ClusteServer IPs.
6. Save and close the file, open the keepalive configuration file on both servers & add the below para
nano /etc/keepalived/keepalived.conf
vrrp_script chk_haproxy {
script "killall -0 haproxy" # to check haproxy process
&interval 2 # every 2 seconds
weight 2 # add 2 datapoints id OK
}
7. Uncomment the below para from keepalived.conf configuration file:
track_script {
chk_haproxy
}
8. Save and close the file.
9. Restart the keepalived service and ensure to perform this in the Master Node first:
systemctl restart keepalived.service
10. Restart the haproxy service. Make sure to perform this in Master-Node first
systemctl restart haproxy.service
11. Verify the haproxy service status. Make sure to perform this in Master-Node first
systemctl status haproxy.service
If you find any issues in starting HAProxy Service, execute the below command:
setsebool -P haproxy_connect_any=1
Allow required ports from the system firewall for communication between servers (5306, 3306, 80 etc.)
HA-Proxy Statistics
You might have noticed that we have used the options stats enable and stats auth someuser:somepassword in the HAProxy configuration.
This allows us to access (password-protected) HAProxy statistics under the URL http://10.10.3.99/stats
If you do not need the statistics, just comment or remove the stats lines from the HAProxy configuration.
DB configuration in the application
url=jdbc:mysql://10.10.3.99:5306/cid_sprint37?characterEncoding=UTF-8
user=haproxy_admin
cred=mypassword
poolsize=50
Where we are using the DB connection URL as VIP address and port, we configured it in the mysql-cluster section of HAProxy configuration.
Was this article helpful?
.png)