Context Based MFA
- 03 Oct 2024
- 15 Minutes to read
- Print
- DarkLight
- PDF
Context Based MFA
- Updated on 03 Oct 2024
- 15 Minutes to read
- Print
- DarkLight
- PDF
Article summary
Did you find this summary helpful?
Thank you for your feedback
Cross Identity support, built-in Multi-Factor Authentication (MFA) support for platform login, and selective integrated application access through its advanced access control policies. The policies can be defined in CI based on the User’s Roles, Devices, Networks and other user contexts.
CI provides intelligent access decisions while reducing friction for end users. Combining contextual data signals to assess risk, CI determines whether to grant access with or without additional authentication factors or deny the access by evaluating the risks.

If a user comes from a specific IP range, you can configure what MFA should apply to that user.
Refer to the Installation Guide to install the Cross Identity portal.
MFA Frequency Setup for CI Global Login
CI Global Login MFA Frequency (Minutes): Enter a frequency-time (in minutes) in this field. This will define how frequently users should be prompted for an MFA if they re-login into Cross Identity. If they re-login within the specified time specified in this field, they will not be prompted for an MFA. A cookie will be set in the browser with a frequency whenever a user logs in.

Context-Based Step-Up Authentication for Global Login: Cross Identity allows administrators to create a separate policy for additional authentication to enable users to pass through and verify MFA while logging in to CI. This ensures that the logged-in user goes through an additional level of MFA.
Policy
Navigate to Security > Advanced Access Management. The following screen appears.

Click Add Policy. The General Settings tab screen appears.
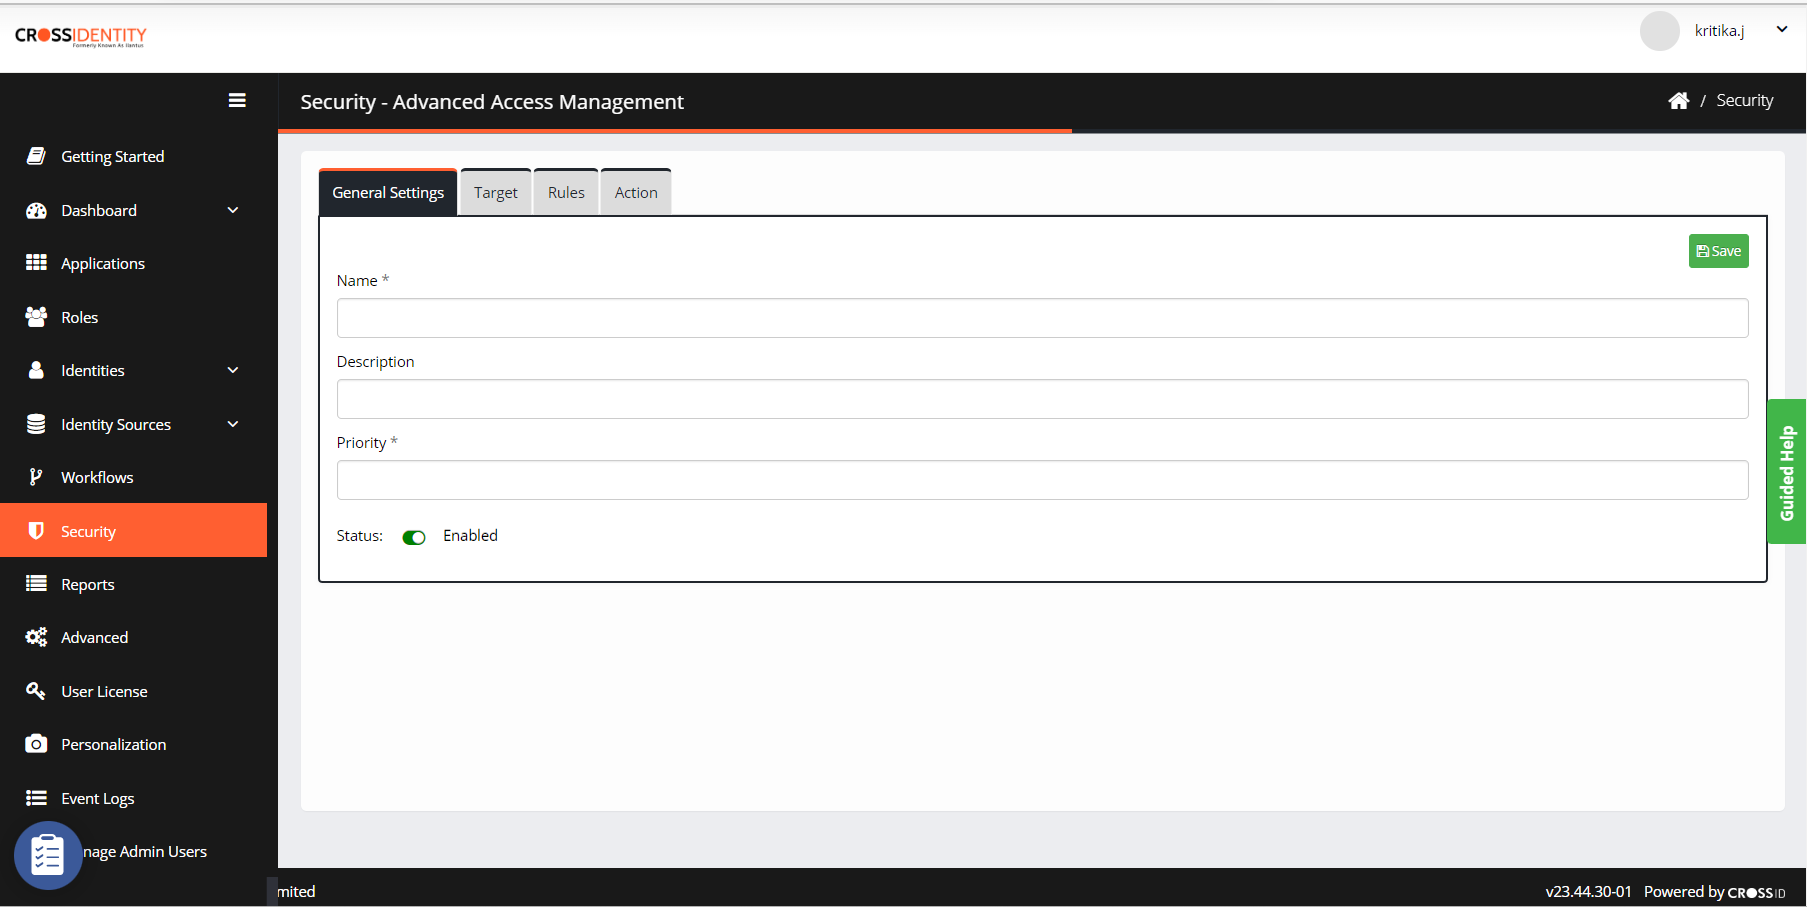
Enter the Policy Name, Description and Priority.


Information:
If there are two authentication policies, then the policy with the higher priority will be executed first. The priority with the lowest numeric value will always be considered the highest priority.
Target
You can choose the Target applications for which the Advanced Access Management policy will apply.
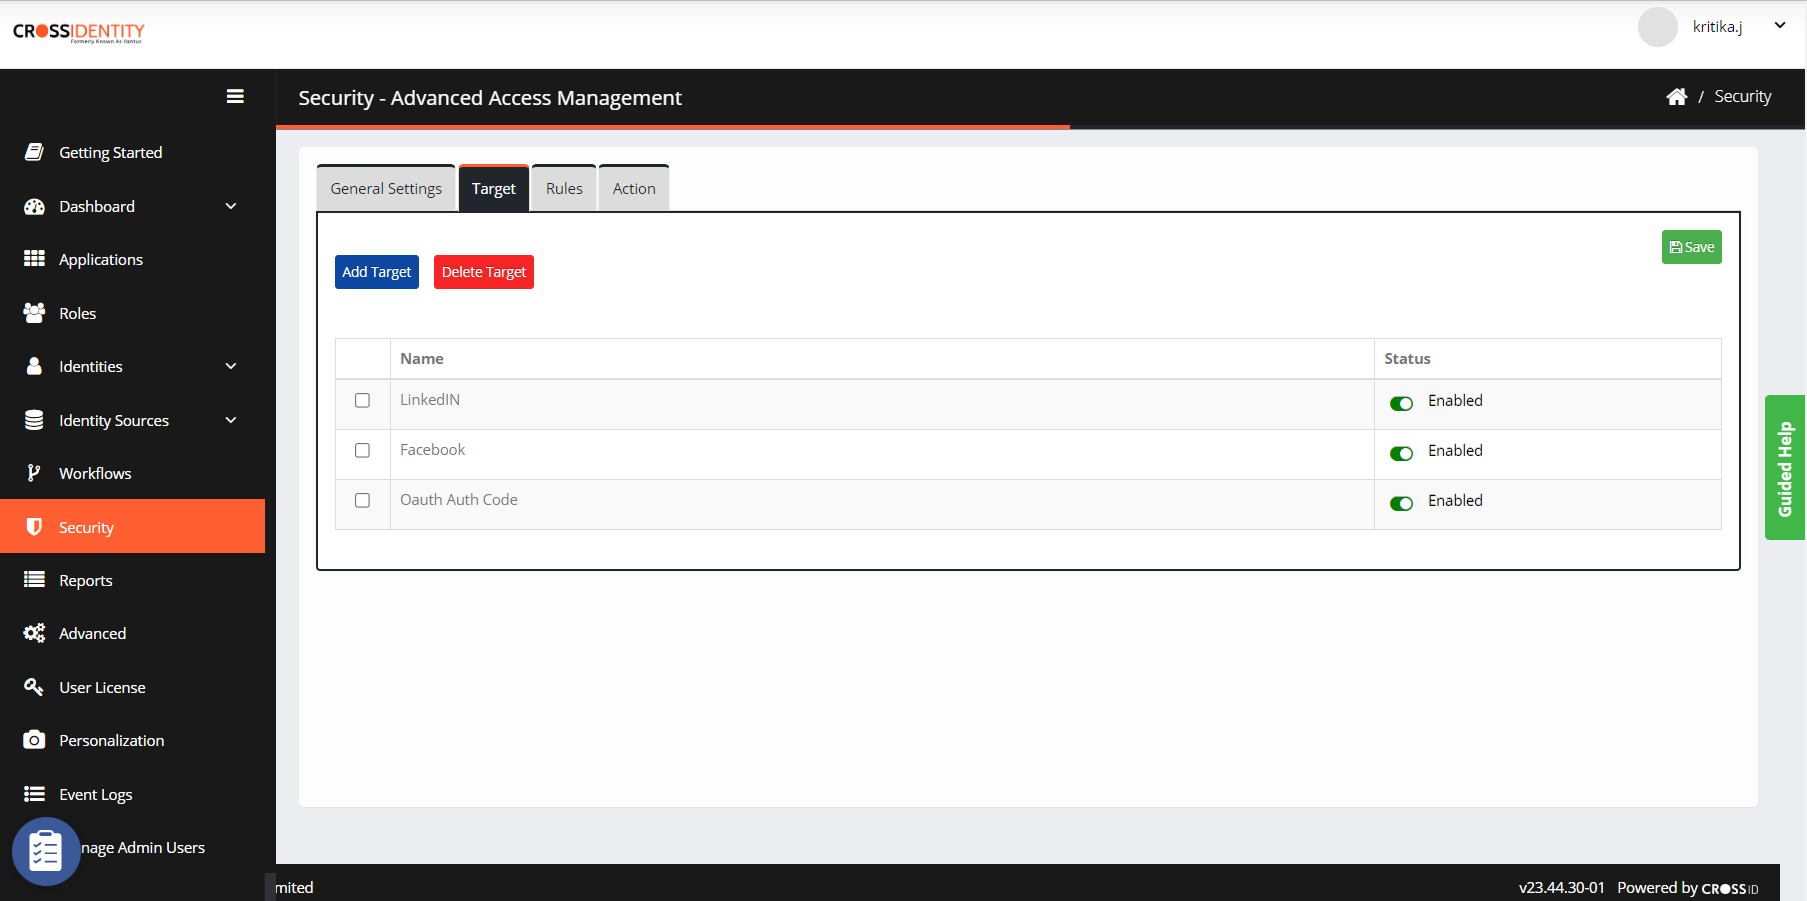
Click Add Target and add CI Login (Global) as a target to enable MFA.
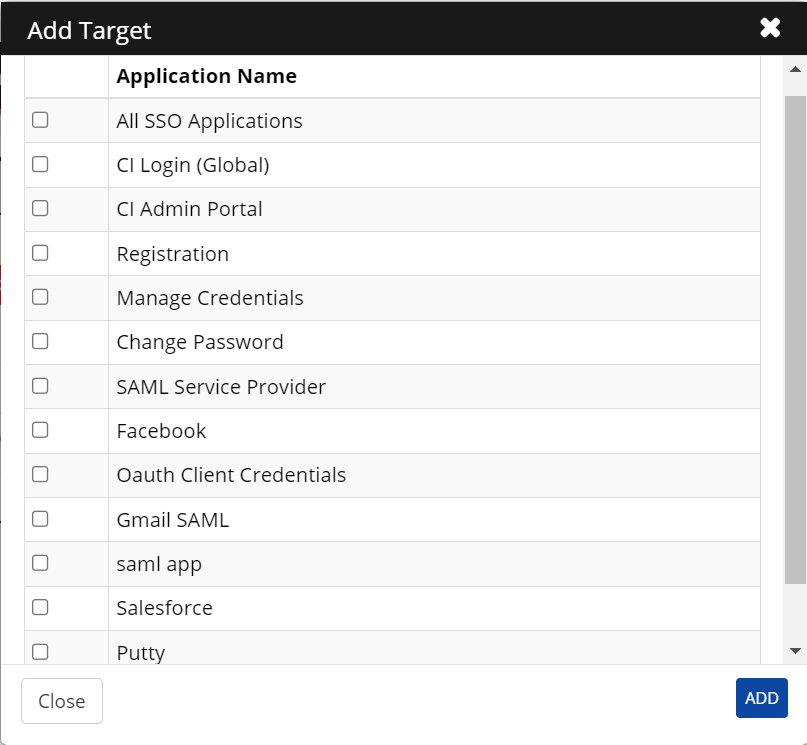
Select the checkboxes against the applications you want to execute the Advanced Access Management policy.
Click Add and Save.


Rules
You can configure multiple contexts for an application based on which the user must be authenticated with MFA.
Click Rules. You can select different contexts by checking the boxes against them.
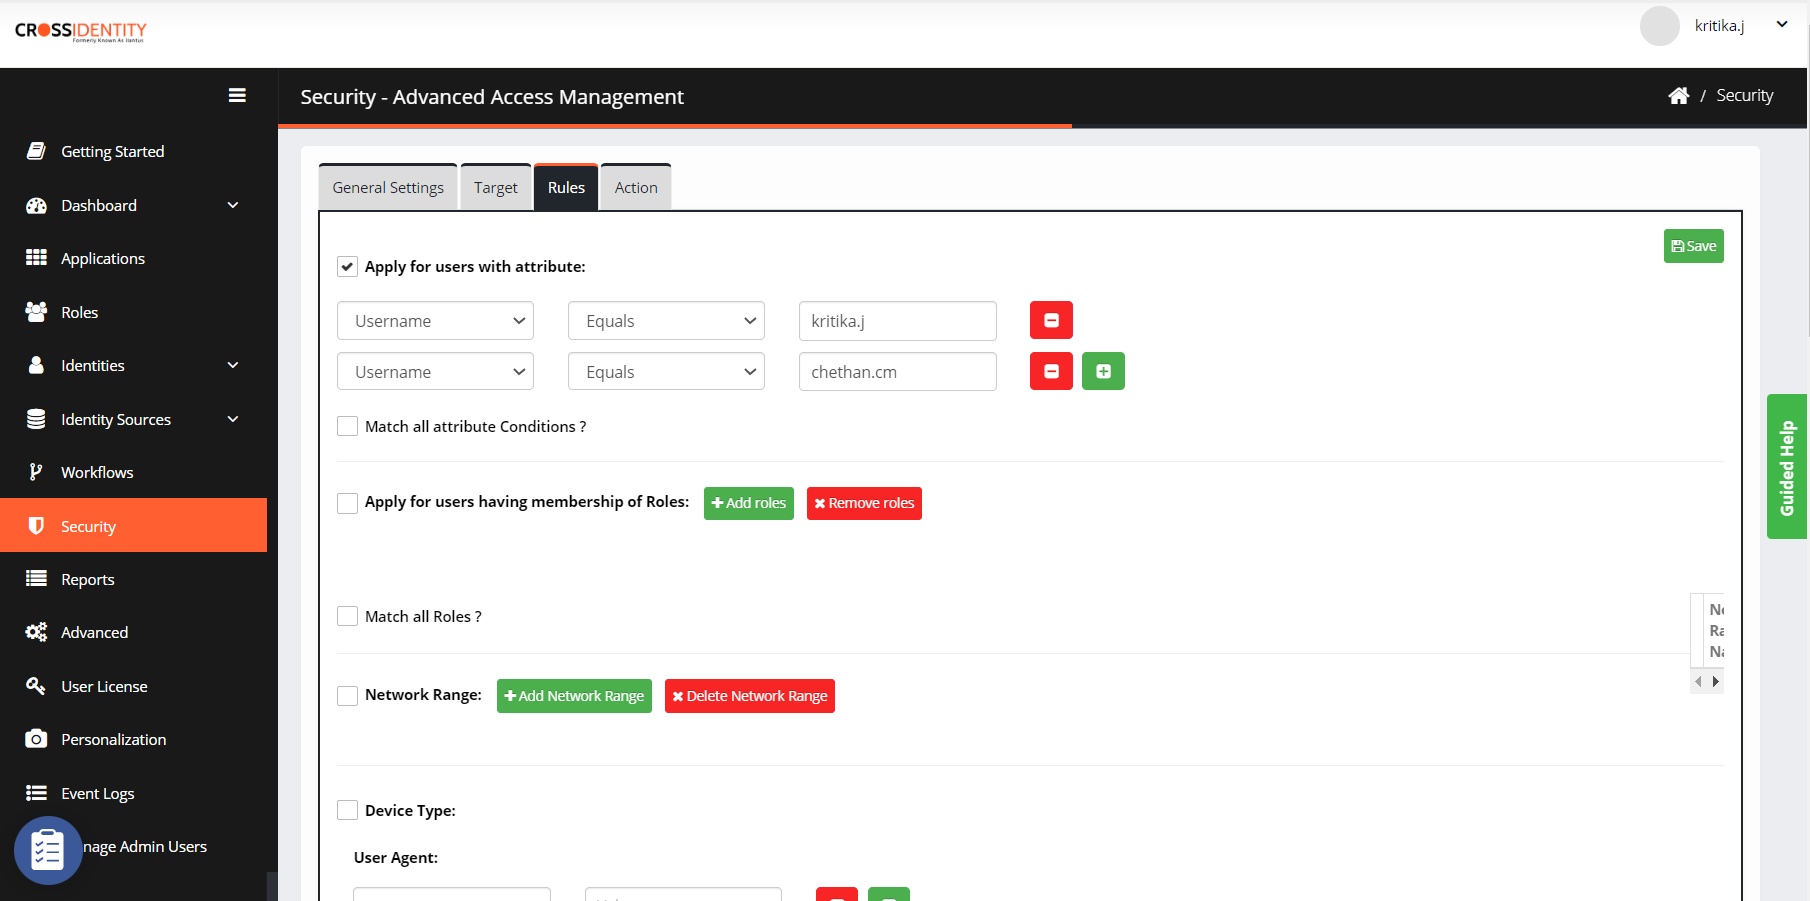
Apply for users with attribute(User Attribute): Cross Identity can use various user attributes as context for step-up or step-down authentication. The Attribute Consists of different conditions, which include Equal to, Not Equal to, Contains and Does Not Contain. Select the Text or Expression from the dropdown list corresponding to the Equal to, Not Equal to, Contains, and Does Not Contain options available in the dropdown list.
Match all attribute conditions: Select the checkbox if you want to match all the added attributes of the user. Uncheck the box to match any of the user's attributes.
Apply for users having membership of Roles (Users membership): The user role membership can also be used as a context wherein only the users belonging to that role will be considered for the policy.
Match all Roles: Select this checkbox if you want to match all the added roles of the user. Uncheck this box to check any of the user's roles.
Network Range: IP-Address will be automatically fetched whenever a user logs in to CI. The solution can use this information to only allow users from this IP to log in. You can add different network ranges by clicking Add Network Range. The Network Range can consist of a range of IP addresses. This screen will display where you can search Network Range and add.

Network range matches based on different conditions, including contains or not. In addition, it verifies whether the network range for the request matches the AND and OR rules.
Match all Network Range: Select this checkbox if you want to match all the added network ranges.
Device Type: Select the checkbox to capture the user's device to log in to CI. Device type captures Hostname, Domain Name, and Device Certificate.
User-Agent: It is the user agent of the browser through which a user can access the application. When a user logs in to the CI, it checks for the user agent request header. User-agent matches based on different conditions, including contains or not. In addition, it verifies whether the user-agent header for the request matches the AND and OR rules.
Match all User Agents: Select the corresponding checkbox to match all of the added User Agents to a specific user. Conversely, uncheck this box to match any one of the added User Agents. Additionally, it also supports AND and OR operations for multiple rules associated with the User-Agent. For instance, the User-Agent rule can be set as "not contains Windows AND User Agent contains Firefox."
Hostname: It is the hostname of the user's device.
Match all Hostnames: Select this checkbox to match all the added Hostnames to a particular user. Uncheck this box if you want to match any of the added hostnames. Hostnames are checked based on different conditions, including equal, not equal, contains, or not contains. Also, it supports AND and OR operations for multiple rules for the Hostname. For example, Hostname 'contains' "SERVER" AND Hostname 'not contain' "HOST78".
Domain Name: The domain to which that user's device is registered or linked.
Match all domain name conditions: Select the checkbox to match a user's domain name. Uncheck this box to match any one of the added domain names. Domain names are matched based on different conditions: equal, not equal, contains, or not contains. It supports AND (for selecting the option) and OR (for unselecting the option) operations for multiple rules for the domain name. For example, the domain name `contains` "crossidentity.com" AND the domain name does `not contains` "crossidentitytest.com"
Match all device types: Select the checkbox to match a user's device types. Uncheck this box to match any one of the added device types. The Device type names are matched based on different conditions, including equal, not equal, contains, or not contains. It supports AND (for selecting the option) and OR (for unselecting the option) operations for multiple rules for the device type.
Device Certificate: The device certificate issued by the organization to a device. The user agent will read the device certificate and other information from the device.
Certificate Issuer: It is issued by the organization to a user. Certificate Issuer name equal, not equal, contains, or not contain a string value. For example, "Certificate Issuer" equals "XYZCompa"yIssuerRoot". Supports multiple values for Certificate Issuers because customers might have multiple certificate issuers. Also, expressions are supported to define the certificate issuer value.
Match all Certificate Issuer: Select this checkbox to match a particular user's device type. Uncheck this box to match any one of the added certificate issuers. The Certificate Issuer name can be matched based on different conditions, including equal, not equal, contains, or not contains. Also, it supports AND (for selecting the option) and OR (for unselecting the option) operations for multiple rules for the certificate issuer.
CRL URL: Captures CRL URL on the desktop and the machine. It is used to verify against a machine rather than being reviewed by a third party.
OCSP URL: Enter the Online Certificate Status Protocol(OCSP) server URL. The certificate is authenticated against the OCSP URL to check for revocation.
Note:
This is an optional field.
Enable Certification Validation: Select the checkbox to enable certificate validation.
Geolocation: Select the checkbox to set up control for user actions for a specific location. The user action must be changed per the defined rules upon changing the user location. The location option consists of different conditions: Equal to, Not Equal to, Contains and Does Not Contain. Select the Text or Expression from the dropdown list corresponding to the Equal to, Not Equal to, Contains, or Does Not Contain options available in the dropdown list.
Information:
It only supports OR operation, and matching all conditions is not applicable.
MAC Address: Select the checkbox to help an admin user authenticate the user against the MAC address of the device from which the application is accessed.
Information:
Ensure MAC addresses in the AAM policy are formatted as six pairs of hexadecimal digits separated by colons (e.g.,
00:1A:2B:3C:4D:5E).Select either Text or Expression from the dropdown list corresponding to the Equal to, Not Equal to, Contains, or Does Not Contain options available in the dropdown list.
IP Risk Score Range: Select the IP Risk Score Range (In Percentage) dropdown between 0 to 100%. Selecting this checkbox, the IP risk rules are applied; when a user logs in to the device, the Minifraud API must be triggered, and a risk score must be detected. For example, an IP with a risk score of 20.00 has a 20% chance of being fraudulent, while a transaction with a risk score of 0.10 has a 0.1% chance of being fraudulent.
Time of Access: Select the required time zone from the Time Zone dropdown list, and correspondingly, the admin user can enter time values in the text field.
Information:
This text field accepts values between 0-23. In addition, the user can enter time in the 24-hours format.
Velocity: Select the option to allow admin users to enter the maximum/minimum velocity value (kilometre per minute). Selecting this checkbox velocity check is done on AAM policy. Also, it accepts a range of values between 1 to 999. In addition, if velocity risk is identified, corresponding AAM conditions will be applied.
Click Save.


Action
Once the contexts are filled and configured, click the Action tab to enable the required MFA.
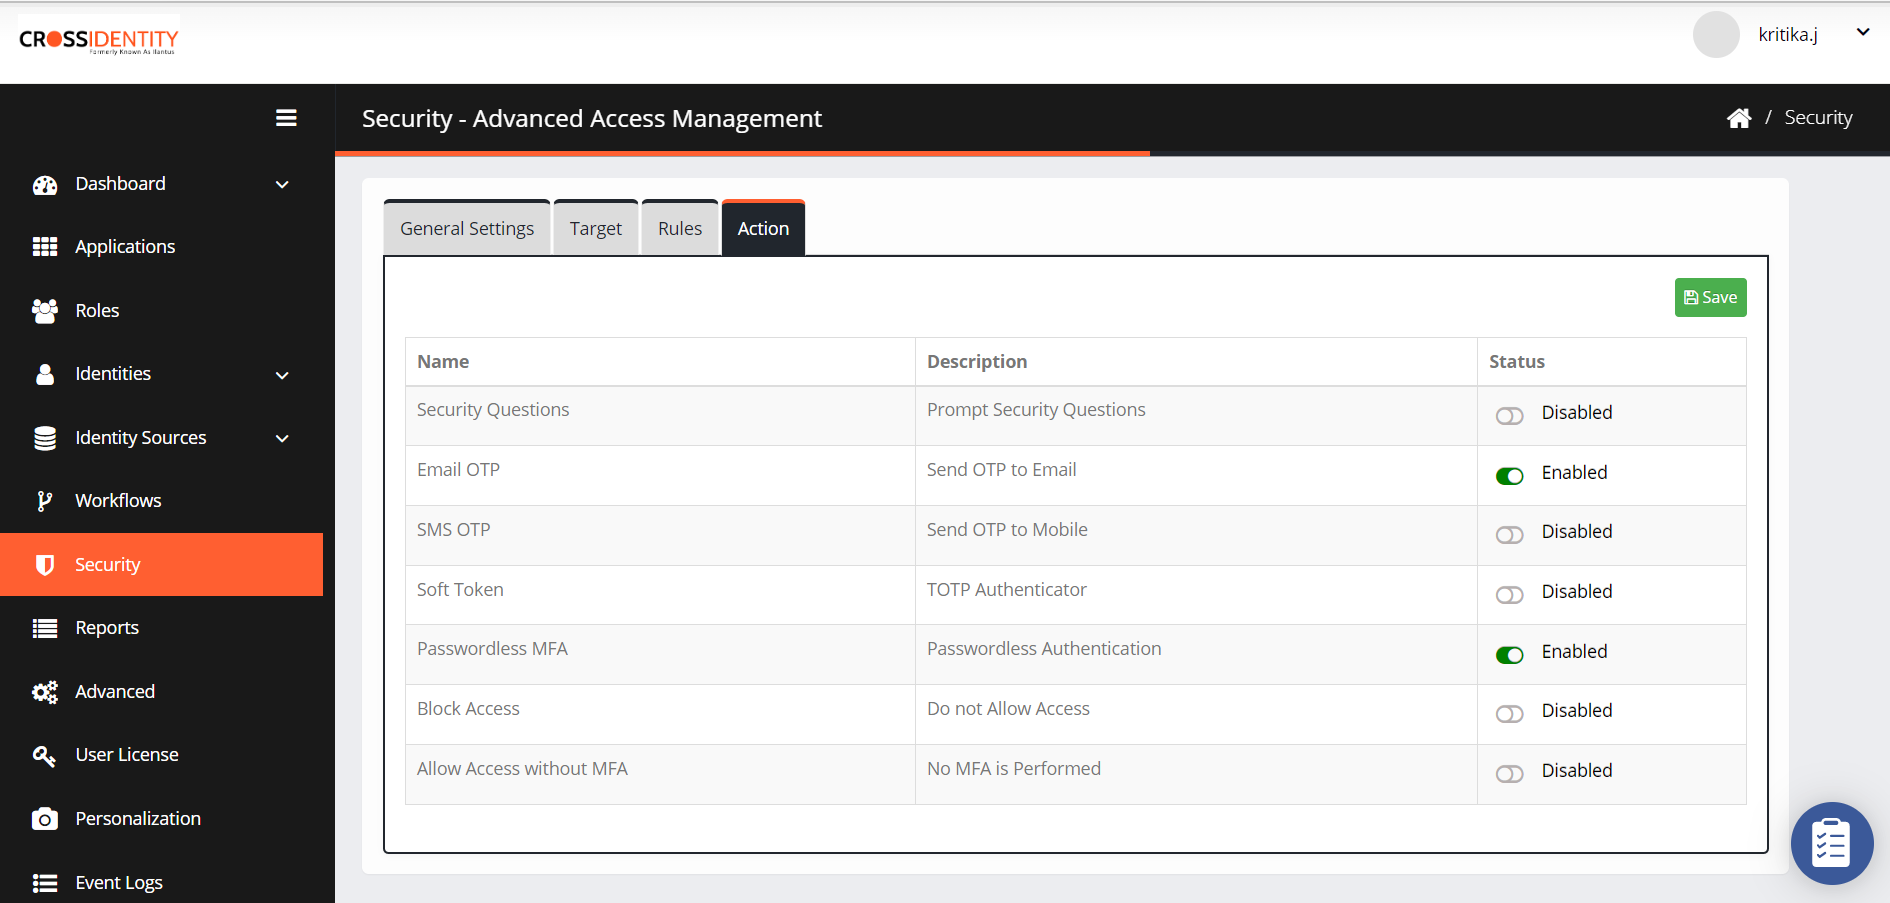
Name: This column contains the various actions you can apply, that is:
Security Questions: Will enable challenge responses for MFA.
Email OTP: Will enable Email OTP for MFA
SMS OTP: Will enable SMS OTP for MFA
Passwordless MFA: Will enable passwordless MFA to access applications/global login.
Soft Token: Will Enable Soft Token for MFA
Block Access: Will block the access if contexts are met
Allow Access without MFA: Skips MFA if contexts are completed.
Status: Indicates each action's status, whether enabled or disabled. You can enable or disable each action. If a user is part of the Target and Rules tab, blocked access applies to the user, and this user will be redirected to the login page and is not allowed to log in.
Click Save.

MFA Frequency Setup for Application SSO Login
Application SSO Login MFA Frequency: When you set the MFA frequency for SSO applications, and any user tries to log in to that application, CI will authenticate with MFA.
Note:
The previous cookie-based MFA system is replaced with a server-based cache method to improve security and avoid tampering. Now, MFA prompts will not appear when signing in from a new device, change in IP address or location. It will only ask for MFA after a specified period of time.

Context-Based Step-Up Authentication for SSO Application MFA: Cross Identity allows administrators to create a separate policy for additional authentication that forces users to verify with MFA before accessing any SSO Application. Here, admins can mention the application name.
Policy
Go to Security > Advanced Access Management. The following screen appears.

Click Add Policy. The General Settings tab screen appears.
Enter the Policy Name, Description and Priority.
Information:
If there are two authentication policies, then the policy with the higher priority will be executed first. The priority with the lowest numeric value will always be considered the highest priority.

Target
You can choose the Target applications for which the Advanced Access Management policy will apply.
Click Add Target. Add the SSO application where you want to enable MFA.
Click Add and Save.
Rules
You can configure multiple contexts for an application based on which the user must be authenticated with MFA.
Click Rules. You can select different contexts by checking the boxes against them.
Apply for users with attribute( User Attribute): Cross Identity can use various user attributes as context for step-up or step-down authentication. The Attribute Consists of different conditions, which include Equal to, Not Equal to, Contains and Does Not Contain. Select the Text or Expression from the dropdown list corresponding to the Equal to, Not Equal to, Contains, and Does Not Contain options available in the dropdown list.
Match all attribute conditions: Select the checkbox if you want to match all the added attributes of the user. Uncheck the box to match any of the user's attributes.
Apply for users having membership of Roles (Users membership): The user role membership can also be used as a context wherein only the users belonging to that role will be considered for the policy.
Match all Roles: Select this checkbox if you want to match all the added roles of the user. Uncheck this box to check any of the user's roles.
Network Range: IP-Address will be automatically fetched whenever a user logs in to CI. The solution can use this information to only allow users from this IP to log in. You can add different network ranges by clicking Add Network Range. The Network Range can consist of a range of IP addresses. This screen will display where you can search Network Range and add.
Network range matches based on different conditions, including contains or not. In addition, it verifies whether the network range for the request matches the AND and OR rules.
Match all Network Range: Select this checkbox if you want to match all the added network ranges.
Device Type: Select the checkbox to capture the user's device to log in to CI. Device type captures Hostname, Domain Name, and Device Certificate.
User-Agent: It is the user agent of the browser through which a user can access the application. When a user logs in to the CI, it checks for the user agent request header. User-agent matches based on different conditions, including contains or not. In addition, it verifies whether the user-agent header for the request matches the AND and OR rules.
Match all User Agents: Select the corresponding checkbox to match all of the added User Agents to a specific user. Conversely, uncheck this box to match any one of the added User Agents. Additionally, it also supports AND and OR operations for multiple rules associated with the User-Agent. For instance, the User-Agent rule can be set as "not contains Windows AND User Agent contains Firefox."
Hostname: It is the hostname of the user's device.
Match all Hostnames: Select this checkbox to match all the added Hostnames to a particular user. Uncheck this box if you want to match any of the added hostnames. Hostnames are checked based on different conditions, including equal, not equal, contains, or not contains. Also, it supports AND and OR operations for multiple rules for the Hostname. For example, Hostname 'contains' "SERVER" AND Hostname 'not contains' "HOST78".
Domain Name: The domain to which that user's device is registered or linked.
Match all domain name conditions: Select the checkbox to match a user's domain name. Uncheck this box to match any one of the added domain names. Domain names are matched based on different conditions: equal, not equal, contains, or not contains. It supports AND (for selecting the option) and OR (for unselecting the option) operations for multiple rules for the domain name. For example, the domain name `contains` "crossidentity.com" AND the domain name does `not contains` "crossidentitytest.com"
Match all device types: Select the checkbox to match a user's device types. Uncheck this box to match any one of the added device types. The Device type names are matched based on different conditions, including equal, not equal, contains, or not contains. It supports AND (for selecting the option) and OR (for unselecting the option) operations for multiple rules for the device type.
Device Certificate: The device certificate issued by the organization to a device. The user agent will read the device certificate and other information from the device.
Certificate Issuer: It is issued by the organization to a user. Certificate Issuer name equal, not equal, contains, or not contain a string value. For example, "Certificate Issuer" equals "XYZCompa"yIssuerRoot". Supports multiple values for Certificate Issuers because customers might have numerous certificate issuers. Also, expressions are supported to define the certificate issuer value.
Match all Certificate Issuer: Select this checkbox to match a particular user's device type. Uncheck this box to match any one of the added certificate issuers. The Certificate Issuer name can be matched based on different conditions, including equal, not equal, contains, or not contains. Also, it supports AND (for selecting the option) and OR (for unselecting the option) operations for multiple rules for the certificate issuer.
CRL URL: Captures CRL URL on the desktop and the machine. It is used to verify against a machine rather than being reviewed by a third party.
OCSP URL: Enter the Online Certificate Status Protocol(OCSP) server URL. The certificate is authenticated against the OCSP URL to check for revocation.
Note: This is an optional field.
Enable Certification Validation: Select the checkbox to enable certificate validation.
Geolocation: Select the checkbox to set up control for user actions for a specific location. The user action must be changed per the defined rules upon changing the user location. The location option consists of different conditions: Equal to, Not Equal to, Contains and Does Not Contain. Select the Text or Expression from the dropdown list corresponding to the Equal to, Not Equal to, Contains, or Does Not Contain options available in the dropdown list.
Information:
It only supports OR operation, and matching all conditions is not applicable.
MAC Address: Select the checkbox to help an admin user authenticate the user against the MAC address of the device from which the application is accessed. Select either Text or Expression from the dropdown list corresponding to the Equal to, Not Equal to, Contains, or Does Not Contain options available in the dropdown list.
IP Risk Score Range: Select the IP Risk Score Range (In Percentage) dropdown between 0 to 100%. Selecting this checkbox, the IP risk rules are applied; when a user logs in to the device, the Minifraud API must be triggered, and a risk score must be detected. For example, an IP with a risk score of 20.00 has a 20% chance of being fraudulent, while a transaction with a risk score of 0.10 has a 0.1% chance of being fraudulent.
Time of Access: Select the required time zone from the Time Zone dropdown list, and correspondingly, the admin user can enter time values in the text field.
Information:
This text field accepts values between 0-23. In addition, the user can enter time in the 24-hours format.
Velocity: Select the option to allow admin users to enter the maximum/minimum velocity value (kilometre per minute). Selecting this checkbox velocity check is done on AAM policy. Also, it accepts a range of values between 1 to 999. In addition, if velocity risk is identified, corresponding AAM conditions will be applied.
Click Save.
Action
Once the contexts are filled and configured, click the Action tab to enable the required MFA.

Name: This column contains the various actions you can apply for Advance Access Management, that is:
Security Questions: Will enable Challenge responses for MFA.
Email OTP: Will enable email OTP for MFA
SMS OTP: Will enable SMS OTP for MFA
Soft Token: Will enable soft token for MFA
Passwordless MFA: will enable passwordless MFA to access applications/global login.
Block Access: Will block the access if contexts are met
Allow Access without MFA: Skips MFA if contexts are completed.
Status: The status of each action, i.e. whether it is enabled or disabled, is displayed to indicate its current state. Each action can be toggled between enabled and disabled modes as per the requirement. If a user is included in the Target and the Rules tab is enabled, their access will be blocked, and they will be redirected to the login page, making it impossible for them to log in.
Click Save.

Was this article helpful?
.png)