- 23 Jul 2024
- 4 Minutes to read
- Print
- DarkLight
- PDF
CI Apache Web Server Setup
- Updated on 23 Jul 2024
- 4 Minutes to read
- Print
- DarkLight
- PDF
Overview
The document provides a comprehensive guide for setting up and configuring the Apache Web Server, ensuring seamless communication with Tomcat through AJP ports.
Apache Web Server Installation & Configuration Steps
Note:
As per the architecture finalized, identify the server where the respective component is to be installed and configured.
Pre-requisites:
Server with a sudo non-root user.
Ensure that the default HTTP port (port 80) is available and not used by other applications.
If you have a firewall enabled, configure it to allow traffic on the ports used by Apache (e.g., port 80 for HTTP or port 443 for HTTPS).
AJP Ports should be open between Apache and Tomcat.
Ensure connectivity between App servers (Tomcat) and Apache Web servers.
Communication to/from the App server to Target applications is required at the time of application integration.
Steps to install Apache on RHEL:
The following are the steps to setup and configure Apache Web Server:
Note:
Please ensure that the AJP port of the tomcat is open (default port: 8009)
Install Apache using the below command:
sudo yum update
sudo yum install httpd
To configure Apache for tasks such as setting up virtual hosts, enabling SSL, or managing modules, you need to edit the Apache configuration files in the /etc/httpd/conf directory.
Go to etc/httpd/conf and create a file ‘workers.properties’ and put the below content in it. If the file already exists, then modify it accordingly.
#Defining no of workers
worker.worker1.type=ajp13
worker.worker1.port=5009
worker.worker1.host=10.10.1.11
worker.worker1.lbfactor=1
worker.worker2.type=ajp13
worker.worker2.port=8009
worker.worker2.host=10.10.3.44
worker.worker2.lbfactor=1
#Configure the loadbalancer
worker.list=balancer
#worker.list=worker2
worker.balancer.type=lb
worker.balancer.balance_workers=worker1,worker2
worker.balancer.method=B
worker.balancer.sticky_session=True
worker.list=jkstatus
worker.jkstatus.type=status

Go to the location - etc/httpd/conf/httpd.conf and edit the httpd.conf using the below command:
vi httpd.conf
Add the below content in httpd.conf:
ServerTokens Prod
ServerSignature Off
#To load the mod_jk.so module
LoadModule jk_module modules/mod_jk.so
# Specify path to worker configuration file
JkWorkersFile conf/workers.properties
# Configure logging
JkLogFile logs/mod_jk.log
JkLogLevel error
# Configure monitoring
JkMount /jkmanager* jkstatus
# Configure applications with loadbalancer
JkMount /CIDSaas* balancer
<Location "/server-status">
SetHandler server-status
Require host [give the host IP]
</Location>
Start the Apache service using the below command:
sudo systemctl start httpd
To ensure that Apache starts automatically on system boot, enable it as a systemd service:
sudo systemctl enable httpd
To stop service use the below command:
sudo systemctl stop apache2
To check the status of Apache:
sudo systemctl status apache2
Steps to install Apache on Ubuntu:
Install Apache using the below command:
sudo apt install apache2
Download mod_jk.so connector file and place it in /usr/lib/apache2/modules/
sudo apt install libapache2-mod-jk
sudo a2enmod jk
The mod_jk.so will be downloaded in the /usr/lib/apache2/modules/mod_jk.so. This is a different apache2 directory.
Only the path for the mod_jk.so path will be used, so make sure to make a note of it.
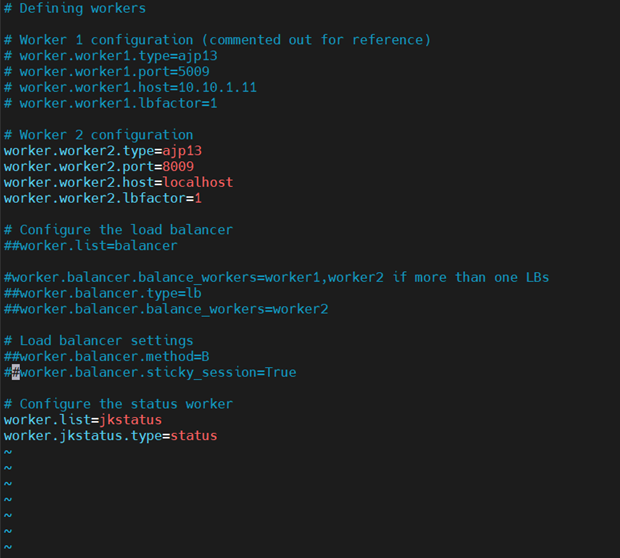
Go to etc/httpd/conf and create a file ‘workers.properties’ and put the below content in it:
#Defining no of workers
worker.worker1.type=ajp13
worker.worker1.port=5009
worker.worker1.host=10.10.1.11
worker.worker1.lbfactor=1worker.worker2.type=ajp13
worker.worker2.port=8009
worker.worker2.host=10.10.3.44
worker.worker2.lbfactor=1
#Configure the loadbalancer
worker.list=balancer
#worker.list=worker2
worker.balancer.type=lb
worker.balancer.balance_workers=worker1,worker2
worker.balancer.method=B
worker.balancer.sticky_session=True
worker.list=jkstatus
worker.jkstatus.type=status

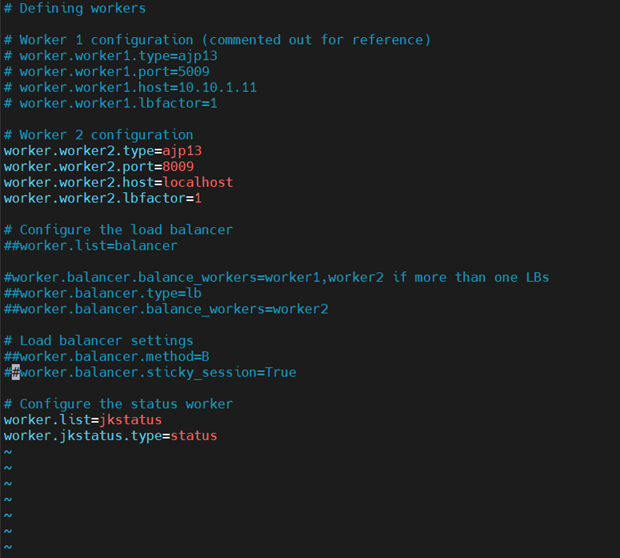
There might be two workers.properties files in the /etc directory.
One file is in the location: /etc/apache2/mods-available.
Another file is present in /etc/libapache2-mod-jk (default configuration).
The server won’t run if they both are present. Ensure that only one workers.properties file is active to avoid configuration conflicts.Go to /etc/apache2/conf-enabled and open
vi jk.conf
Comment out the path for the default workers.properties file.
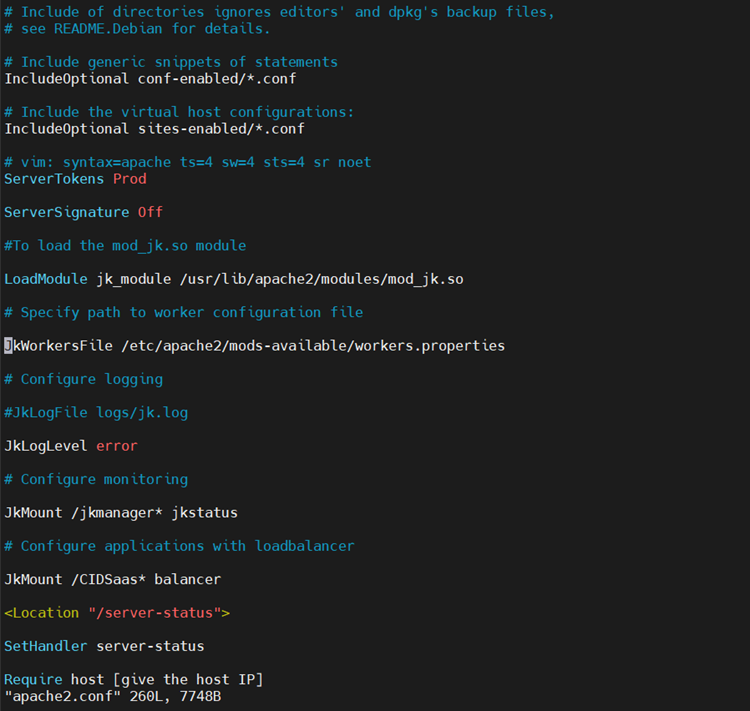
Go to the location - /etc/apache2,
vi apache2.conf
Edit the apache.conf file as per configuration provided below:

Start the services using the below command:
sudo systemctl start apache2 sudo systemctl enable apache2
To stop the services use the below command:
sudo systemctl stop apache2
To check the status of Apache:
sudo systemctl status apache2
Note:
Load balancer (LB) has to be configured with the nodes mentioned in Apache setup. The respective node IP and Port (Apache listening port: 80) of Apache web servers must be shared with the LB team so that LB can be configured. Once the LB is configured, the LB URL should be shared by the LB team.
If SSL is enabled on the load balancer (listening port: 443), then the SSL certificate must be deployed on the LB server as well.
This will be the URL of the CI and the same URL has to be updated in the database as well.
If LB is not present, and Apache is configured, then Apache will act as LB; and CI URL will be the Apache server IP and port.
If both Apache and LB are not present then the CI URL will be the Tomcat IP and Port.
Security Configurations
Perform the following changes in the 000-default.conf file. This file is present in the following location:
/etc/apache2/sites-available/000-default.conf
Header set Content-Security-Policy: "default-src 'self'
https://sprint44.Crossidentityqa.com/
https://www.google.com/
http://www.w3.org/2000/svg
https://cdn.whatfix.com/prod/
https://whatfix.com/service/
https://cdn.jsdelivr.net
https://www.google-analytics.com/
https://code.jquery.com
https://unpkg.com
https://cdnjs.cloudflare.com
https://fonts.gstatic.com
https://fonts.googleapis.com
https://cdn.datatables.net/1.10.21/css/jquery.dataTables.min.css
https://cdn.datatables.net/select/1.3.1/css/select.dataTables.min.css
https://cdn.datatables.net/1.10.21/js/jquery.dataTables.min.js
https://cdn.datatables.net/select/1.3.1/js/dataTables.select.min.js
https://js-agent.newrelic.com;font-src
'self' data:
https://cdn.jsdelivr.net
https://www.google-analytics.com/
https://code.jquery.com
https://unpkg.com
https://cdnjs.cloudflare.com
https://fonts.gstatic.com
https://fonts.googleapis.com
https://cdn.datatables.net/1.10.21/css/jquery.dataTables.min.css
https://cdn.datatables.net/select/1.3.1/css/select.dataTables.min.css
https://cdn.datatables.net/1.10.21/js/jquery.dataTables.min.js
https://cdn.datatables.net/select/1.3.1/js/dataTables.select.min.js;img-src
* data:; media-src 'self' 'unsafe-inline'
https://cdn.jsdelivr.net
https://www.google-analytics.com/
https://code.jquery.com
https://unpkg.com
https://cdnjs.cloudflare.com
https://fonts.gstatic.com
https://fonts.googleapis.com
https://cdn.datatables.net/1.10.21/css/jquery.dataTables.min.css
https://cdn.datatables.net/select/1.3.1/css/select.dataTables.min.css
https://cdn.datatables.net/1.10.21/js/jquery.dataTables.min.js
https://cdn.datatables.net/select/1.3.1/js/dataTables.select.min.js;style-src
'self' 'unsafe-inline'
https://cdn.jsdelivr.net
https://www.google-analytics.com/
https://code.jquery.com
https://unpkg.com
https://cdnjs.cloudflare.com
https://fonts.gstatic.com
https://fonts.googleapis.com
https://cdn.datatables.net/1.10.21/css/jquery.dataTables.min.css
https://cdn.datatables.net/select/1.3.1/css/select.dataTables.min.css
https://cdn.datatables.net/1.10.21/js/jquery.dataTables.min.js
https://cdn.datatables.net/select/1.3.1/js/dataTables.select.min.js
script-src 'self' 'unsafe-inline' 'unsafe-eval'
https://www.google.com/recaptcha/
https://www.gstatic.com/recaptcha/
https://cdn.whatfix.com/
https://cdn.jsdelivr.net
https://www.google-analytics.com/
https://code.jquery.com
https://unpkg.com
https://cdnjs.cloudflare.com
https://fonts.gstatic.com
https://fonts.googleapis.com
https://cdn.datatables.net/1.10.21/css/jquery.dataTables.min.css
https://cdn.datatables.net/select/1.3.1/css/select.dataTables.min.css
https://cdn.datatables.net/1.10.21/js/jquery.dataTables.min.js
https://cdn.datatables.net/select/1.3.1/js/dataTables.select.min.js
script-src-elem 'self' 'unsafe-inline' 'unsafe-eval'
https://www.google.com/recaptcha/
https://www.gstatic.com/recaptcha/
https://www.google.com/recaptcha/api.js
https://www.gstatic.com/recaptcha/
https://whatfix.com/
https://cdn.whatfix.com/
https://cdn.jsdelivr.net
https://www.google-analytics.com/
https://code.jquery.com
https://unpkg.com
https://cdnjs.cloudflare.com
https://fonts.gstatic.com
https://fonts.googleapis.com
https://cdn.datatables.net/1.10.21/css/jquery.dataTables.min.css
https://cdn.datatables.net/select/1.3.1/js/dataTables.select.min.js
https://cdnjs.cloudflare.com/ajax/libs/semantic-ui/2.3.1/semantic.min.js
https://cdn.datatables.net/1.10.21/js/dataTables.semanticui.min.js
https://cdn.datatables.net/1.10.21/js/jquery.dataTables.min.js
https://cdn.datatables.net/1.10.21/css/dataTables.semanticui.min.css
https://cdnjs.cloudflare.com/ajax/libs/semantic-ui/2.3.1/semantic.min.css
https://cdn.datatables.net/1.10.21/css/dataTables.semanticui.min.css
Outcome
Following the steps outlined in the document ensures the successful installation and configuration of the Apache Web Server with mod_jk connector for AJP communication with Tomcat. The setup includes load balancer configuration and necessary adjustments to Apache's settings, resulting in a robust and balanced deployment ready to handle application traffic seamlessly. Additionally, the document emphasizes the importance of communicating load balancer details, SSL deployment, and the default behavior in the absence of a load balancer or Apache server.
.png)


.png)