- 25 Jun 2024
- 4 Minutes to read
- Print
- DarkLight
- PDF
CI App Setup (Tomcat)
- Updated on 25 Jun 2024
- 4 Minutes to read
- Print
- DarkLight
- PDF
Tomcat is a Java web application server providing a pure Java HTTP web server environment where Java code can run. It is widely used to host web applications and is known for its stability and performance.
Note:
As per the architecture finalized, identify the server where the respective component is to be installed and configured.
The following are the steps to set up the Tomcat server:
Download the apache-tomcat application server tar file with the below command under /opt/cidserver path:
wget https://archive.apache.org/dist/tomcat/tomcat-9/v9.0.73/bin/apache-tomcat-9.0.73.tar.gz
Create directory cidserver inside /opt.
sudo mkdir /opt/cidserver
Create directory tomcat inside /cidserver.
sudo mkdir /opt/cidserver
Copy the archive file of the apache-tomcat-9.0.73 version to the /opt/cidserver/tomcat/ directory of CI using the following command:
mv apache-tomcat-9.0.73.tar.gz /opt/cidserver/tomcat/
Extract apache-tomcat-9.0.73.tar.gz it to directory /opt/cidserver/tomcat/apache-tomcat- 9.0.73/ using the following command:
tar -xzf apache-tomcat-9.0.73.tar.gz
Verify that the apache-tomcat folder is correctly created in the tomcat directory after extraction.

Create a setenv.sh file in the /opt/cidserver/tomcat/apache-tomcat-9.0.73/bin directory
touch setenv.sh
Using the following command, you can verify the java path:
sudo update-alternatives --config java

Add the following lines in setenv.sh file, after verifying the java path.
Note:
The following lines are just an example. Update the java path as per point no.8
export JRE_HOME="/usr/lib/jvm/java-1.8.0-openjdk-1.8.0.282.b08- 1.el7_9.x86_64/jre"
export JAVA_HOME="/usr/lib/jvm/java-1.8.0-openjdk-1.8.0.282.b08- 1.el7_9.x86_64/jre"
export CATALINA_HOME="/opt/cidserver/tomcat/apache-tomcat-9.0.73"
Note:
Please execute the JRE commands wrt the path of JRE folder location installed in the respective servers. You can skip step 3, if you want to create a tomcat service file as follows
Create a tomcat.service file in /etc/systemd/system directory as follows for tomcat:
touch tomcat.service
Note down and change the JAVA path and tomcat path accordingly to your environment. Also set MAX MIN RAM usage for tomcat service accordingly.
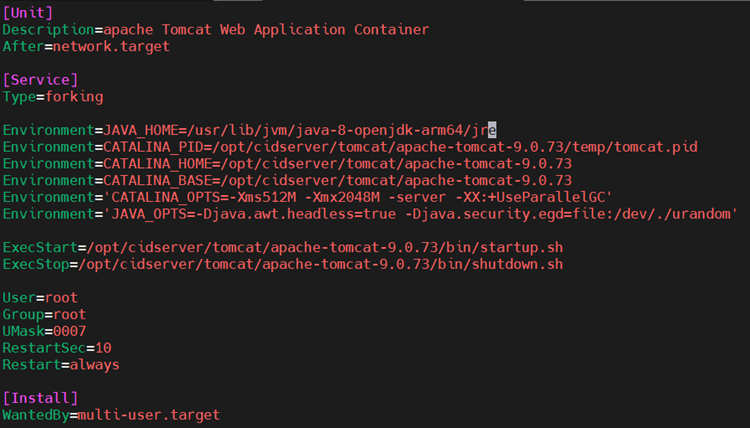
Open the tomcat.service file and copy the following lines:
Note:
Please execute the JRE commands wrt the path of JRE folder location installed in the respective servers.
[Unit]
Description=Apache Tomcat Web Application Container After=network.target
[Service] Type=forking
Environment=JAVA_HOME=/usr/lib/jvm/java-1.8.0-openjdk-1.8.0.282.b08- 1.el7_9.x86_64/jre
Environment=CATALINA_PID=/opt/cidserver/tomcat/apache-tomcat- 9.0.73/temp/tomcat.pid
Environment=CATALINA_HOME=/opt/cidserver/tomcat/apache-tomcat-9.0.73
Environment=CATALINA_BASE=/opt/cidserver/tomcat/apache-tomcat-9.0.73
Environment='CATALINA_OPTS=-Xms512M -Xmx2048M -server - XX:+UseParallelGC'
Environment='JAVA_OPTS=-Djava.awt.headless=true - Djava.security.egd=file:/dev/./urandom'
Environment="JAVA_OPTS=-Djava.security.egd=file:///dev/urandom" ExecStart=/opt/cidserver/tomcat/apache-tomcat-9.0.73/bin/startup.sh ExecStop=/opt/cidserver/tomcat/apache-tomcat-9.0.73/bin/shutdown.sh User=root
Group=root UMask=0007 RestartSec=10 Restart=always [Install]
WantedBy=multi-user.target

Save and close the file.
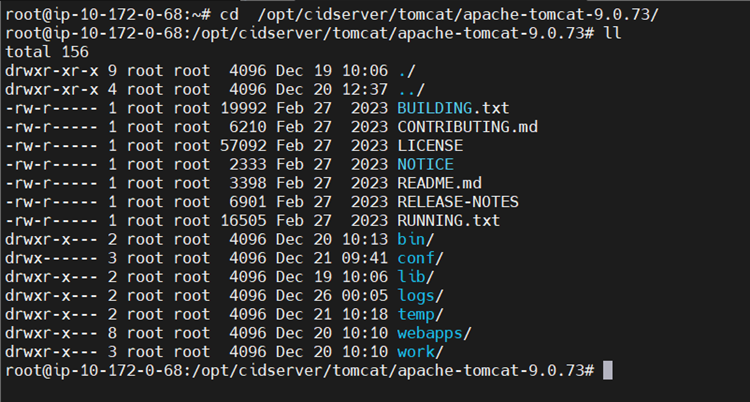
Navigate to the document root directory of the server that is /opt/cidserver/tomcat/apache- tomcat-9.0.73/.
cd /opt/cidserver/tomcat/apache-tomcat-9.0.73/
List all the files present in the root directory using ll command:

The path of webapps directory is /opt/cidserver/tomcat/apache-tomcat-9.0.73/webapps/.
The path of log directory is /opt/cidserver/tomcat/apache-tomcat-9.0.73/logs/
Ensure that the port number defined in server.xml is correct in the next steps.
To ensure that the port number defined in server.xml is correct, navigate to the conf folder (/opt/cidserver/tomcat/apache-tomcat-9.0.73/conf/) and open the server.xml file and change the server shutdown port from -1 to 8005.
cd /conf
vi server.xml <Server port="8005" shutdown="SHUTDOWN">
Copy and paste or uncomment the Connector port in server.xml file of tomcat.
<Connector port="8009" protocol="AJP/1.3" redirectPort="8443" />

Locate web.xml file in the same folder (conf) and Copy and paste or uncomment the following lines. They represent session timeout configuration.
<session-config>
<session-timeout>30</session-timeout>
</session-config>

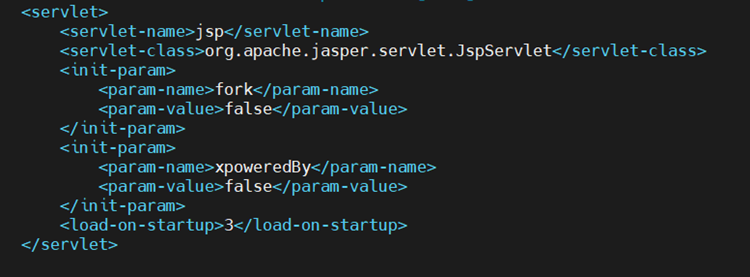
In the same file (web.xml), check if the following configuration is present in the file. If present, make sure the configuration matches. Ensure that the indentation is correct:
Output:
<servlet>
<servlet-name>jsp</servlet-name>
<servlet-class>org.apache.jasper.servlet.JspServlet</servlet-
class>
<init-param>
<param-name>fork</param-name>
<param-value>false</param-value>
</init-param>
<init-param>
<param-name>xpoweredBy</param-name>
<param-value>false</param-value>
</init-param>
<init-param>
<param-name>mappedfile</param-name>
<param-value>false</param-value>
</init-param>
<load-on-startup>3</load-on-startup>
</servlet>

CIDSaas.war files to be deployed in webapps directory of tomcat.
Note:
At the time of deployment, the war file is shared separately.
Start the tomcat service. The CIDSaas.war file will be extracted.
service tomcat start

Stop the tomcat service.
service tomcat stop
Configuration
Deployment Pre-requisites
If Cross Identity is deployed on a customer’s on-premises environment and if they are using SAML SSO or Soft-token MFA, then the system time of CI server nodes must sync with the real-time. Otherwise, both these use cases will fail.
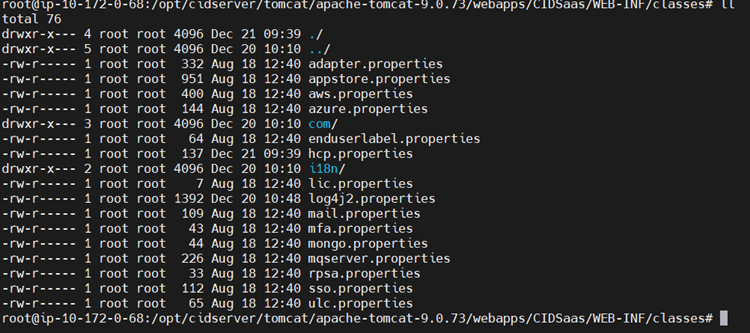
Go to the following path and update the following properties files from the said directory.
/opt/cidserver/tomcat/apache-tomcat-9.0.73/webapps/CIDSaas/WEB- INF/classes/

hcp.properties (DB details): This file holds the connectivity parameters between CIDDB, you need to encrypt all DB parameters (to do this you can use EncDecUtil.java file which is in CIDSaas source code via eclipse) encryption details before and after as show below:
Note:
Encryption can be provided by the product team if needed.
The Database details for the below configuration can be collected as followed in section 2.1
Before Encryption:
url=jdbc:mysql://<DBserverIP>:<DBport>/CID_databasename?characterEncoding=UTF-8
user=cidadmin
cred=Admin@123#
poolsize=50
Note:
The DB server IP could be the IP of the Loadbalancer, or the standalone DB node, and the port number will also vary based on LB/ standalone node. This must be made sure during the implementation.
After Encryption:
url=y93bS7VX6Z/WyKYMrEedx9mioTPg3gljgsiN61IClKoRpVYumVZx/D0LypyCofGfYcq9Gh1i86Lq1CT1/gmuo3E=user=1dzKXPpJ9Z4=
user=1dzKXPpJ9Z4=
cred=4N3UQeF6od6Uhw==
poolsize=50

log4j.properties (log path): This file holds the custom logs, add the following tomcat log path:
log4j.appender.file.File=/opt/cidserver/tomcat/apache-tomcat- 9.0.73/logs/CIDSaas_myapp.log

Configuration file context.xml can be located in /opt/cidserver/tomcat/apache-tomcat- 9.0.73/conf/ directory to SET the CI DB and CI AUDIT DB for JDBC connections.
Note:
DB URL, DB Name, DB-Username and DBPasswords are encrypted.
Before Encryption:
<Resource name="jdbc/CIDAUDIT" auth="Container" type="
javax.sql.DataSource" maxActive="10" maxIdle="5" maxWait="10000"
username="cidadmin"
password="Admin@123#"
driverClassName="com.mysql.jdbc.Driver"
url="jdbc:mysql://DBserverIP:DB_Port/cid_audit"/>
After Encryption:
<Resource name="jdbc/CIDAUDIT" auth="Container" type="javax.sql.DataSource"maxActive="10" maxIdle="5" maxWait="10000"
username="1dzKXPpJ9Z4==="
password="4N3UQeF6od6Uhw=="
driverClassName="com.mysql.jdbc.Driver"
url="y93bS7VX6Z/WyKYMrEedx9mioTPg3gljgsiN61IClKoRt1M4mUw="/>
Start the tomcat service using the following command:
bash /opt/cidserver/tomcat/apache-tomcat-9.0.73/bin/startup.sh
Else, if created tomcat service as mentioned above then,
service tomcat start/stop/restart/status
After the deployment of CIDSaas.war files, verify whether the service has got started and it is connecting to the Hazelcast Server using the following command:
ps -eaf | grep tomcat and netstat –tupln
If all the services are up and running, open the browser and type the CI URL as configured in the database (For example, http://<IP>:<port>/CIDSaas). CIDSaas admin portal login screen should appear.
Note:
The IP address and the port may vary depending on whether CI is installed in a standalone tomcat or Apache Web Server or Load balancer. If LB is not present, and Apache is configured, then Apache will act as LB; and CI URL will be the Apache server IP and port.
If both Apache and LB are not present, then the CI URL will be the Tomcat IP and Port.
Outcome
Following the provided document for Cross Identity setup will result in the successful installation and configuration of the Cross Identity system. The steps involve setting up Java runtime, configuring CI App (Tomcat), and deploying necessary files. The outcome will be a functional Cross Identity system with secure communication channels, proper database configurations, and a running admin portal accessible through the configured CI URL.
Operations and Maintenance
To stop, start, or check the status of a Tomcat, you can use the following commands depending on your operating system.
service tomcat start
service tomcat stop
service tomcat status
.png)


.png)