- 24 Jun 2024
- 32 Minutes to read
- Print
- DarkLight
- PDF
CI DB Server Node
- Updated on 24 Jun 2024
- 32 Minutes to read
- Print
- DarkLight
- PDF
Overview
This document will show how to set up the Cross Identity’s Database system.
Database Installation & Configuration Steps
H/W Specification
CI Components (Production) | Platform | Type | Count | Storage |
|---|---|---|---|---|
Linux for Apache (Web) Server Nodes | Ubuntu or RHEL | 4 core & 8GB RAM | 2 | 50GB |
Linux for CI Server Nodes | Ubuntu or RHEL | 4 core & 8GB RAM | 2 | 50GB |
Linux for CI Recon+Notification | Ubuntu or RHEL | 4 core & 8GB RAM | 1 | 50GB |
Linux server for Hazelcast | Ubuntu or RHEL | 4 core & 8GB RAM | 2 | 50GB |
Linux server for Rabbit MQ + MQ receiver | Ubuntu or RHEL | 4 core & 8GB RAM | 1 | 50GB |
Linux for MySQL (Percona) | Ubuntu or RHEL | 4 core & 8GB RAM | 3 | 50GB |
Important:
Minimum 3 load balancers required - One connected with CI, other one required for DB and one for Agent.
Standalone Database Setup (MySQL)
Note:
As per the architecture finalized, identify the server where the respective component is to be installed and configured
Pre-requisites:
RHEL/Ubuntu Server with a non-root user with sudo privileges.
If you have a firewall enabled, configure it to allow traffic on the ports used by MySQL.
Ensure connectivity between the Database and Apache Web servers.
Ensure connectivity between the Database and CI App servers (Tomcat).
Ensure connectivity between Database and Scheduler Servers.
Ensure connectivity between Database and Receiver Servers.
Steps to install MySQL server on RHEL:
Note:
Ensure, you have updated the yum repositories to latest by below command.
Collect the MySQL binaries from the Cross Identity SharePoint folder shared by the CI team.
Install the Database binary package shared by CI team using the following command.
Install MySQL's latest version (currently 8.0) using the following command.
yum install mysql-community-server
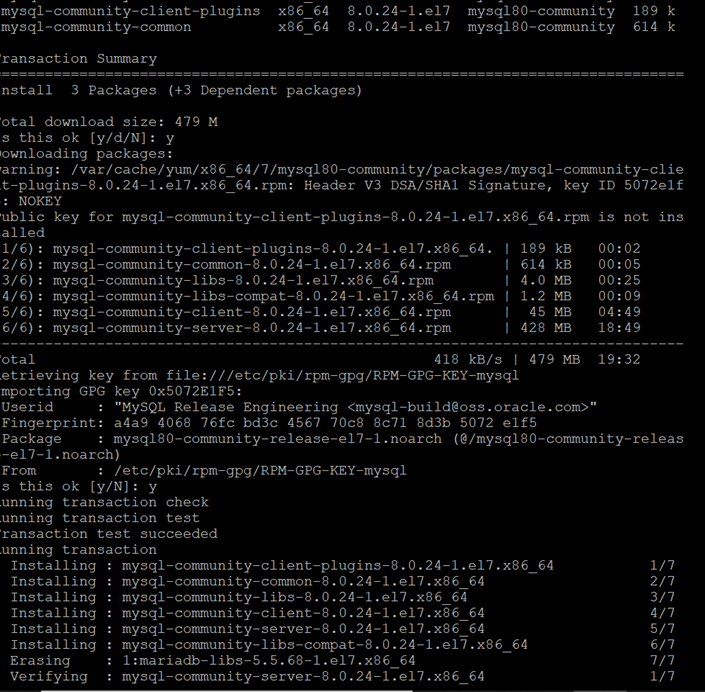
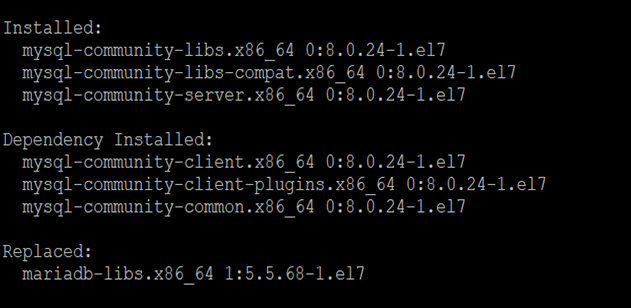
The above command installs all the needed packages for MySQL server mysql-community-server, mysql-community-client, mysql-community-common and mysql-community-libs.
Starting the MySQL Server
sudo service mysqld start

You can verify the status of the MySQL server with the help of the following command:
sudo service mysqld status
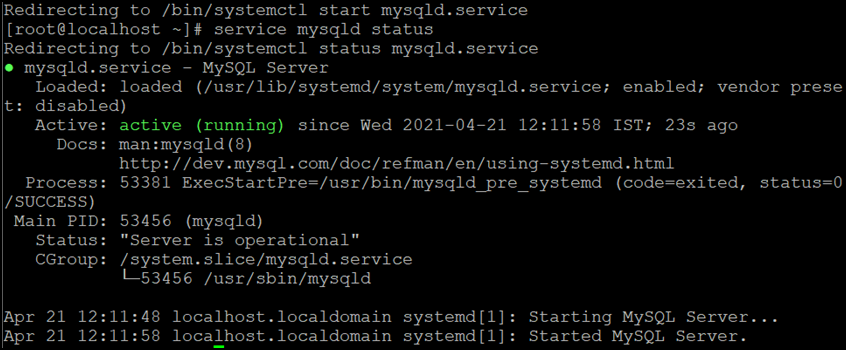
Secure the MySQL Installation and use the following command to view the password before running the MySQL secure command:
grep 'temporary password' /var/log/mysqld.log

Steps to install MySQL server on Ubuntu:
Update the package list:
sudo apt update
Install the MySQL Server package:
sudo apt install mysql-server
You will be prompted to set a root password for MySQL during the installation. Follow the instructions to set the password.
Start the MySQL service:
sudo systemctl start mysql
sudo systemctl enable mysql
Note:
If Standalone Database is configured, the IP and Port of the database server will be the the URL of the CI Database and the same URL has to be updated in the hcp.properties as well.
Clustered DB Setup (Percona)
Pre-requisites:
The prerequisites for XSO DB Cluster installation are:
Get the ‘root’ user access.
Make sure the SELINUX is disabled state (cat /etc/sysconfig/selinux)
Get Percona XtraDB Cluster Package
Get the Percona XtraBackup package.
Ensure that the following ports are not blocked by firewall or used by other software. Percona XtraDB Cluster requires them for communication:
3306
4444
4567
4568
Information:
To check the status of SELINUX-
sestatus
Installing Percona XtraDB Cluster on Debian or Ubuntu:
Update the system:
sudo apt update
Install the necessary packages:
sudo apt install -y wget gnupg2 lsb-release curl
Download the repository package
wget https://repo.percona.com/apt/percona-release_latest.generic_all.deb
Install the package with dpkg :
sudo dpkg -i percona-release_latest.generic_all.deb
Refresh the local cache to update the package information:
sudo apt update
Enable the release repository for the Percona XtraDB Cluster:
sudo percona-release setup pxc80
Install the cluster:
sudo apt install -y percona-xtradb-cluster
Note:
During the installation, you are requested to provide a password for the root user on the database node. Remember this password as it will be used to login to MySQL while setting up the databases.
After you install Percona XtraDB Cluster and stop the mysql service, configure the node according to the procedure described below.
$ sudo service mysql stop
Installing Percona XtraDB Cluster on RHEL:
Follow the below commands to install the percona XtraDB cluster on RHEL 7 or 8 or later.
$ sudo yum install https://repo.percona.com/yum/percona-release-latest.noarch.rpm
$ sudo percona-release enable-only pxc-80 release
$ sudo percona-release enable tools release
$ sudo yum install percona-xtradb-cluster
$ sudo yum install https://repo.percona.com/yum/percona-release-latest.noarch.rpm
$ sudo percona-release setup pxc-80
$ sudo yum install percona-xtradb-cluster
After the installation, start the mysql service and find the temporary password using the grep command.
$ sudo service mysql start
$ sudo grep 'temporary password' /var/log/mysqld.log
Use the temporary password to log into the server:
$ mysql -u root -p
Run an ALTER USER statement to change the temporary password, exit the client, and stop the service.
mysql> ALTER USER 'root'@'localhost' IDENTIFIED BY 'rootPass'; mysql> exit
$ sudo service mysql stop
Configure nodes for write-set replication:
After installing Percona XtraDB Cluster on each node, you must configure the cluster. In this section, we will demonstrate configuring a three-node cluster:
Node | Host | IP |
|---|---|---|
Node 1 | pxc1 | 52.87.196.8 |
Node 2 | pxc2 | 54.166.230.126 |
Node 3 | pxc3 | 54.90.218.153 |
Stop the Percona XtraDB Cluster server. After the installation completes the server is not started. You need this step if you have started the server manually.

Edit the configuration file of the first node to provide the cluster settings.
If you use Debian or Ubuntu, edit /etc/mysql/mysql.conf.d/mysqld.cnf

Make the following changes:
wsrep_provider=/usr/lib/galera4/libgalera_smm.so wsrep_cluster_name=pxc-cluster wsrep_cluster_address=gcomm://<IP_address1>,<IP_address2>,<IP_address3>
Configure node1:
wsrep_node_name=pxc1
wsrep_node_address=<IP_address1>
pxc_strict_mode=ENFORCING
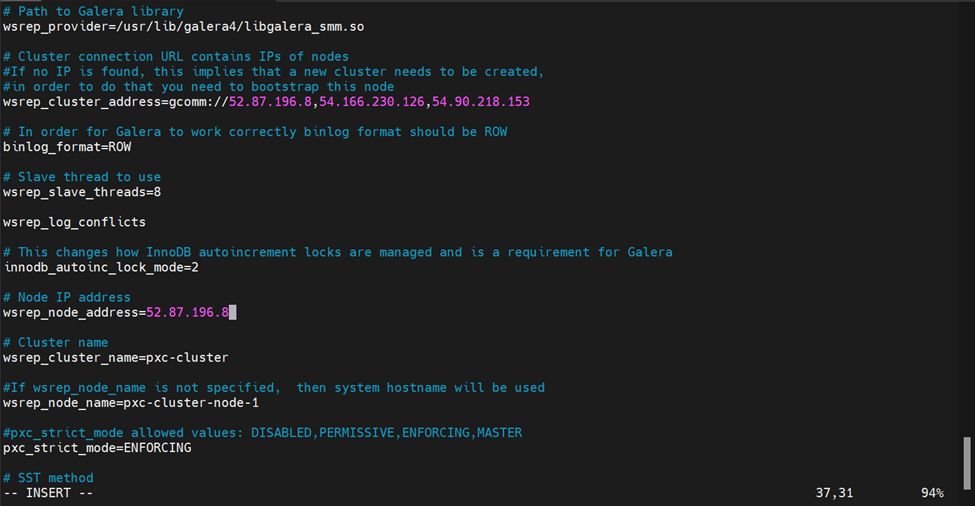
Set up node 2 and node 3 in the same way. Stop the server and update the configuration file applicable to your system. All settings are the same except for wsrep_node_name and wsrep_node_address.
For node2:
wsrep_node_name=pxc2
wsrep_node_address=<IP_address2>
For node3:
wsrep_node_name=pxc3
wsrep_node_address=<IP_address3>
Note:
Ensure that the mysqld.cnf file has all the permissions.
Configure the following details in my.cnf file given below as per the cluster requirements of your environment:
Sr. No.
Changes to be made
Line
Description
1.
Cluster Name
wsrep_cluster_name = my_cluster_name
Set a unique name for your Percona XtraDB Cluster
2.
Node Address
wsrep_node_address = ip_address
The IP address of the node
3.
Cluster Address
wsrep_cluster_address = gcomm://ip1,ip2,ip3
Replace ip1, ip2, ip3, etc., with the IP addresses of your cluster nodes
4.
Node Name
wsrep_node_name = node_name
Replace node_name with a unique identifier for each node.
5.
Galera Provider Configuration
wsrep_provider = /usr/lib/galera4/libgalera_smm.so
wsrep_provider_options = "gcache.size=512M; gcache.page_size=512M"
Adjust the path to libgalera_smm.so based on your installation.
6.
Cluster Configuration Settings
wsrep_sync_wait = 1
wsrep_sst_method = xtrabackup-v2
Configure other Galera and cluster-related settings based on your requirements. This may include settings like wsrep_sync_wait, wsrep_sst_method, etc.
7.
Log and Error Settings
log_error = /var/log/mysql/error.log
log_slave_updates
Adjust the log file path and other options according to your preferences.
Follow the same for the other nodes as well.
If you use RedHat or CentOS, edit /etc/my.cnf
Note:
On these systems, set the wsrep_provider option to a different value.
Here is an example of a full configuration file installed on CentOS to /etc/my.cnf:
sudo vi /etc/my.cnf
# Template my.cnf for PXC
# Edit to your requirements. [client] socket=/var/lib/mysql/mysql.sock [mysqld]
server-id=1 datadir=/var/lib/mysql socket=/var/lib/mysql/mysql.sock log-error=/var/log/mysqld.log
pid-file=/var/run/mysqld/mysqld.pid
# Binary log expiration period is 604800 seconds, which equals 7 days binlog_expire_logs_seconds=604800
######## wsrep ###############
# Path to Galera library wsrep_provider=/usr/lib64/galera4/libgalera_smm.so
# Cluster connection URL contains IPs of nodes
#If no IP is found, this implies that a new cluster needs to be created,
#in order to do that you need to bootstrap this node wsrep_cluster_address=gcomm://
# In order for Galera to work correctly binlog format should be ROW binlog_format=ROW
# Slave thread to use wsrep_slave_threads=8 wsrep_log_conflicts
# This changes how InnoDB autoincrement locks are managed and is a requirement for Galera innodb_autoinc_lock_mode=2
# Node IP address #wsrep_node_address=192.168.70.63
# Cluster name wsrep_cluster_name=pxc-cluster
#If wsrep_node_name is not specified, then system hostname will be used wsrep_node_name=pxc-cluster-node-1
#pxc_strict_mode allowed values: DISABLED,PERMISSIVE,ENFORCING,MASTER pxc_strict_mode=ENFORCING
# SST method wsrep_sst_method=xtrabackup-v2
Essential configuration variables:
Variable name | Description |
wsrep_provider | Specify the path to the Galera library. The location depends on the distribution: • Debian and Ubuntu: /usr/lib/galera4/libgalera_smm.so • Red Hat and CentOS: /usr/lib64/galera4/libgalera_smm.so |
wsrep_cluster_name | Specify the logical name for your cluster. It must be the same for all nodes in your cluster. |
wsrep_cluster_address | Specify the IP addresses of nodes in your cluster. At least one is required for a node to join the cluster, but it is recommended to list addresses of all nodes. This way if the first node in the list is not available, the joining node can use other addresses. |
wsrep_node_name | Specify the logical name for each individual node. If this variable is not specified, the host name will be used. |
wsrep_sst_method | By default, Percona XtraDB Cluster uses Percona XtraBackup for State Snapshot Transfer. xtrabackup-v2 is the only supported option for this variable. This method requires a user for SST to be set up on the initial node. |
pxc_strict_mode | PXC Strict Mode is enabled by default and set to ENFORCING, which blocks the use of tech preview features and unsupported features in Percona XtraDB Cluster. |
binlog_format | Galera supports only row-level replication, so set binlog_format=ROW. |
default_storage_engine | Galera fully supports only the InnoDB storage engine. It will not work correctly with MyISAM or any other non- transactional storage engines. Set this variable to default_storage_engine=InnoDB |
innodb_autoinc_lock_mode | Galera supports only interleaved (2) lock mode for InnoDB. Setting the traditional (0) or consecutive (1) lock mode can cause replication to fail due to unresolved deadlocks. Set this variable to innodb_autoinc_lock_mode=2 |
Bootstrap the first node
After configuring all PXC nodes, initialize the cluster by bootstrapping the first node. The initial node must contain all the data to be replicated to other nodes.
Bootstrapping implies starting the first node without any known cluster addresses: if the wsrep_cluster_address variable is empty, Percona XtraDB Cluster assumes that this is the first node and initializes the cluster.
Instead of changing the configuration, start the first node using the following command:
systemctl start mysql@bootstrap.service

When you start the node using the previous command, it runs in bootstrap mode with wsrep_cluster_address=gcomm://. This tells the node to initialize the cluster with wsrep_cluster_conf_id.
Note:
A service started with mysql@bootstrap must be stopped using the same command. Example, the systemctl stop mysql command does not stop an instance started with the mysql@bootstrap command.
Add nodes to the cluster
New nodes that are properly configured are provisioned automatically. When you start a node with the address of at least one other running node in the wsrep_cluster_address variable, this node automatically joins and synchronizes with the cluster.
Note:
Any existing data and configuration will be overwritten to match the data and configuration of the DONOR node. Do not join several nodes at the same time to avoid overhead due to large amounts of traffic when a new node joins.
Start the second node
Start the second node using the following command:
$ sudo systemctl start mysql
Start the third node
Start the second node using the following command:
$ sudo systemctl start mysql
To check the status of the nodes, run the following:
show status like 'wsrep%';
Configuration of the repository
Create a new DB user with a password
After completing these steps, Percona XtraDB MySQL should be installed and running on your Ubuntu system. You can access the MySQL server using the MySQL client:
mysql -u root -p
Enter the root password you set during the installation when prompted. You can then start working with your MySQL databases.
Connect to the MySQL Server:
mysql -u root -p

Create a MySQL user ('cid_admin'@'%) as CI DB Admin. In addition, grant user access.
CREATE USER ‘<CI DB Admin>’@'%' IDENTIFIED BY '<CI DB Admin Password>';
Example:
CREATE USER 'cid_admin'@'%' IDENTIFIED BY 'Admin1234*'; GRANT ALL PRIVILEGES ON CIDSaas.* TO 'cid_admin'@'%';
Note:
Keep your DB password secure.
Logout as the root user and log in as the new user created in the above step (cid_admin).
Create two databases with names of your choice for CIAudit and CIDSaas.
Following are the commands to create databases:
Create a database for CI using the below command:
create database <CI_databasename>;
Example: Create database cidsaas;
Create a database for CI Audit DB using the below command:
create database <CIAudit_databasename>;
Example: Create database cidaudit;
Grant privileges to the new user (if it is not present) with the below command:
GRANT ALL PRIVILEGES ON <CI_databasename>;* TO ‘<CI DB Admin>'@'%';
GRANT ALL PRIVILEGES ON <CIAudit_databasename>.* TO ‘<CI DB Admin>'@'%';
flush privileges;
To show the created databases, use the following command:
Show databases;
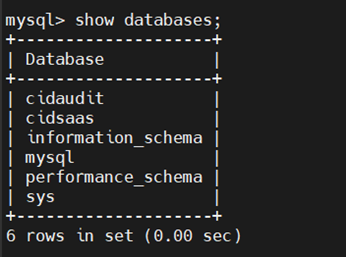
Create the schema for CI DB and CI Audit DB in MySQL
Pre-requisite:
Get the schema data files from the CI team:
Cidsaas.sql
Cidaudit.sql
Now, import the CI Database script with the help of the command,
mysql -u <CI DB Admin> -p <CI_databasename> < “<CI_DB_schema>”
Example:
mysql -u cid_admin -p cidsaas < “cidsaas_schema.sql”
CI database schema is now imported.
Follow the above steps and create one schema for CI Audit database.
mysql -u <CI DB Admin> -p <CI_Audit_databasename> < “<CI_AuditDB_schema >”
Example:
mysql -u cid_admin -p cidaudit < “cidaudit_schema.sql”
Modifying the seeded data
CI team provides the seeded data (.sql) file. Ensure to make the changes as per the environment in the below commands.
Note:
Recommended to modify all the configurations changes in the .sql file before importing it into the Database.
Below are the changes required to be made in the .sql file:
Sr. No. | Command |
|---|---|
1. | update fluidiam_config_properties set config_value='https://appstore-trial.crossidentity.com/appstorenew/customer/apps' where config_key='appstore_url'; |
2. | update fluidiam_config_properties set config_value='https://appstore-trial.crossidentity.com/appstorenew/customer/getapp' where config_key='appdtls'; |
3. | update fluidiam_config_properties set config_value='https://appstore-trial.crossidentity.com/appstorenew/customer/toggleapp' where config_key='apptgle'; |
4. | update fluidiam_config_properties set config_value='https://appstore-trial.crossidentity.com/appstorenew/assets/images/apps' where config_key='appimage'; |
5. | update fluidiam_config_properties set config_value='https://appstore-trial.crossidentity.com/appstorenew/customer/getssoexe' where config_key='appssoexe'; |
6. | update fluidiam_config_properties set config_value='https://appstore-trial.crossidentity.com/appstorenew/customer/getlic' where config_key='lic'; |
7. | update fluidiam_config_properties set config_value='https://appstore-trial.crossidentity.com/appstorenew/assets/dwld' where config_key='connector_war'; |
8. | select * from fluidiam_client /G; i. For client_ID = 101, check if client_type = On Premise Cmd: Update fluidiam_client set client_type = ‘On Premise’ where client_id = 101; ii. agent_rest_url should be as follows: Cmd: Update fluidiam_client set agent_rest_url = ‘<agent_url:Port>/CIDSaas/’ where client_id = 101; |
9. | update fluidiam_config_properties set config_value = 'http://<Schedular_serverIP:Port>/CidSaasNotification/' where config_key = 'schedular-url'; |
10. | update fluidiam_config_properties set config_value=’ https://<CI-URL>/CIDSaas/user/update-aam-info’ where config_key='aamurl'; |
11. | update fluidiam_config_properties set config_value=' http://<CI-URL>' where config_key='iwacallback'; |
12. | update fluidiam_config_properties set config_value='https://<CI-URL>/CIDSaas/' where config_key='sso_url'; |
13. | update fluidiam_config_properties set config_value='https://crossid-melbourne.crossidentity.com' where config_key='portal_uri'; |
14. | update fluidiam_config_properties set config_value='https://<CI-URL>/CIDSaas' where config_key='idaasurl'; |
15. | update fluidiam_config_properties set config_value='https://<CI-URL>/CIDSaas/admin/provwinup/' where config_key='url'; |
16. | update fluidiam_config_properties set config_value='https://<CI-URL>/CIDSaas/admin/importwinup' where config_key='soturl'; |
17. | update fluidiam_config_properties set config_value='http://crossid-melbourne.crossidentity.com/CIDSaas/requestrouter' where config_key='httpurl' |
18. | update fluidiam_config_properties set config_value='<Hazelcast_env_name>' where config_key='hazelcast_env'; |
19. | update fluidiam_config_properties set config_value='<Hazelcast_ServerIP>' where config_key='hazelcast_public_ip1'; |
20. | update fluidiam_config_properties set config_value='<Hazelcast_PrimaryServer_IP>' where config_key='hazelcast_server'; |
21. | update fluidiam_config_properties set config_value='<Hazelcast_groupName>' where config_key='groupName'; |
22. | update fluidiam_config_properties set config_value='https://ppu-portal.crossidentity.com/tenantAdmin/' where config_key='consumption_portal_url'; |
23. | update fluidiam_config_properties set config_value='https://<CI-URL>/assets/images/app-logo.png' where config_key='defaultapplogo'; |
24. | update fluidiam_config_properties set config_value='crossidentity.admin@crossidentity.com' where config_key='smtp_adminusername'; |
25. | update fluidiam_config_properties set config_value='xt/DSvZe/ZzXyPdI4QTegQ==' where config_key='smtp_admincred'; |
Importing seeded data to schema
Once all the changes are made, import the seeded data into the schema.
Below is the command to import the .sql file into the CI DB and CI Audit DB:
mysql -u <CI DB Admin> -p <CI_databasename> < “<CI_DB_seeded_data>”
Example:
mysql -u cid_admin -p cidsaas < “cidsaas.sql”
CID database schema is now imported.
Follow the above steps and create one schema for the CI Audit database.
mysql -u <CI DB Admin> -p <CI_Audit_databasename> < “<CI_AuditDB_seeded_data >”
Example:
mysql -u cid_admin -p cidaudit < “cidaudit.sql”
To customize the application login screen logo, follow the steps below:
Connect to mysql and execute the below command:
update fluidiam_client set client_logo ="/opt/cidserver/tomcat/apache-tomcat-9.0.73/webapps/CIDSaas/assets/images/<logo.png>" where client_id=<ClientID>;
To determine the login credentials for the application page, follow the below steps:
Connect to mysql and execute the below command:
select * from fluidiam_administrator\G;
Username = username and Password = cred

Outcome
Following the documented steps for Standalone Database Setup ensures successful installation and configuration of MySQL on the specified server. It establishes secure access, creates databases for Cross Identity setup, providing instructions for schema import and configuration. The CI DB and CI Audit DB will be configured successfully.
For Clustered DB Setup (Percona), the outcome involves installing and configuring Percona XtraDB Cluster on multiple nodes, enabling secure communication, and emphasizing the need for load balancer configuration for optimal performance and SSL deployment.
Operations and Maintenance
To stop, start, or check the status of a MySQL standalone server, you can use the following commands depending on your operating system.
RHEL: sudo systemctl start mysqld
sudo systemctl stop mysqld
sudo systemctl status mysqld
Ubuntu: sudo service mysql start
sudo service mysql stop
sudo service mysql status
.png)


.png)