- 30 Jan 2024
- 3 Minutes to read
- Print
- DarkLight
- PDF
Thick Client/Desktop Application
- Updated on 30 Jan 2024
- 3 Minutes to read
- Print
- DarkLight
- PDF
Thick Client applications refer to applications that normally involve the installation of applications on a user's machine where the application's security is dependent on the user’s computer. For these applications, most of the business logic such as custom rules, and algorithms to handle information transfer between the database and the user interface is handled on the client side.
Configuring Desktop Application
To configure thick client-based applications:
- In the Applications home tab, click an Application. A pop-out menu option is displayed.

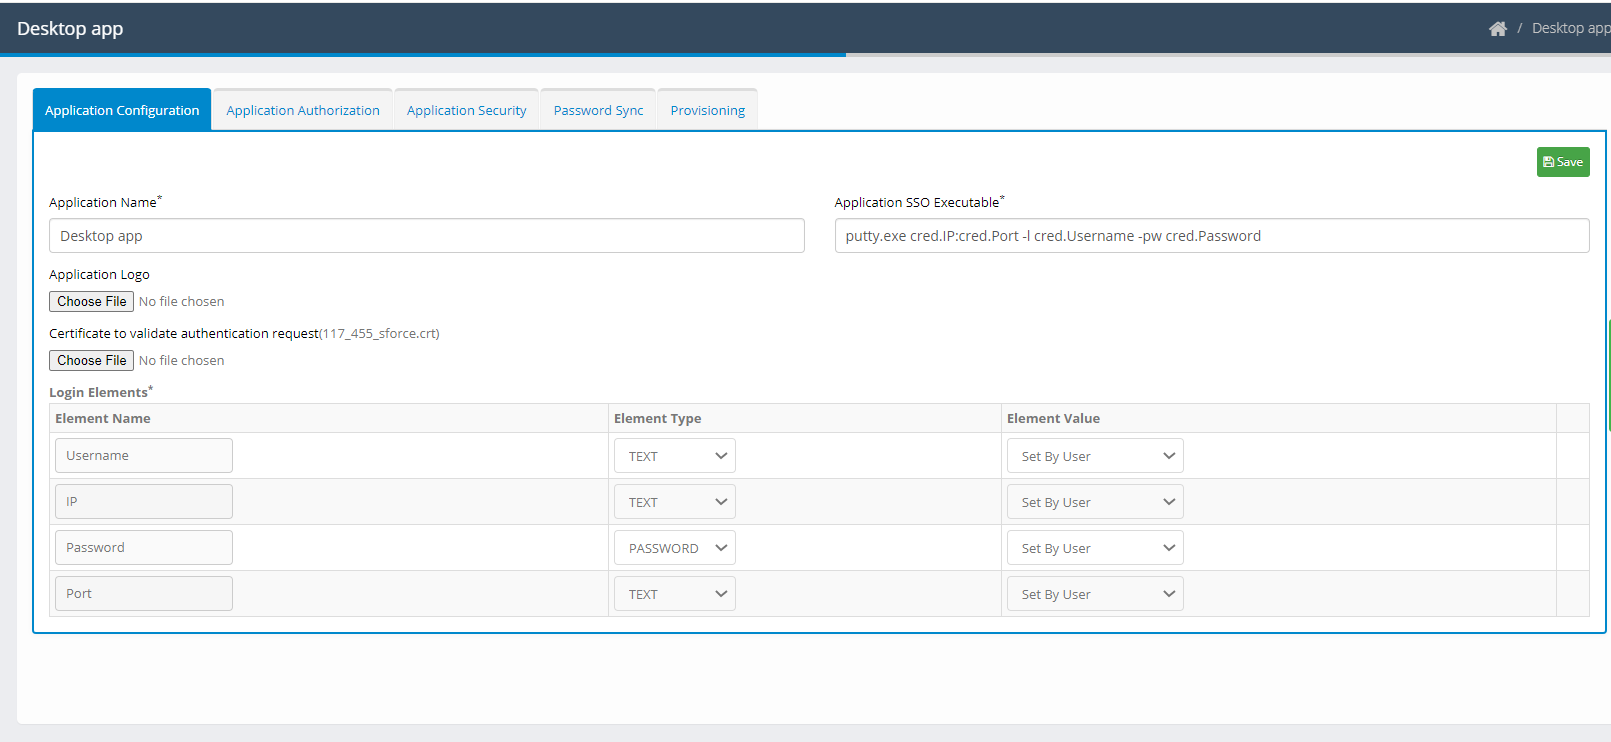
- Click the Edit icon. The Application Configuration screen is displayed.

- Configure the application using the following:
- Application Name: Enter the application name.
- Application Logo: Select the application logo.
- Application SSO Executable: Enter the Application SSO Executable file.
- Login Elements: Select the determinants of login elements based on their type and value. A user/administrator can set element types:
- Set by User: Attribute value set by the user.
- Set by Admin: Attribute value set by the admin.
- Directory Attribute: Attribute value defined by the Active Directory.
- Certificate to validate authentication request: Select the certificate to validate the authentication request.
- Click Save. An “Application updated successfully” confirmation message is displayed.
- Click Close.
Application Authorization
An Administrator allows you to create users and roles. You can perform the following:
- Authorize Roles
- Authorize Users
Authorize Roles
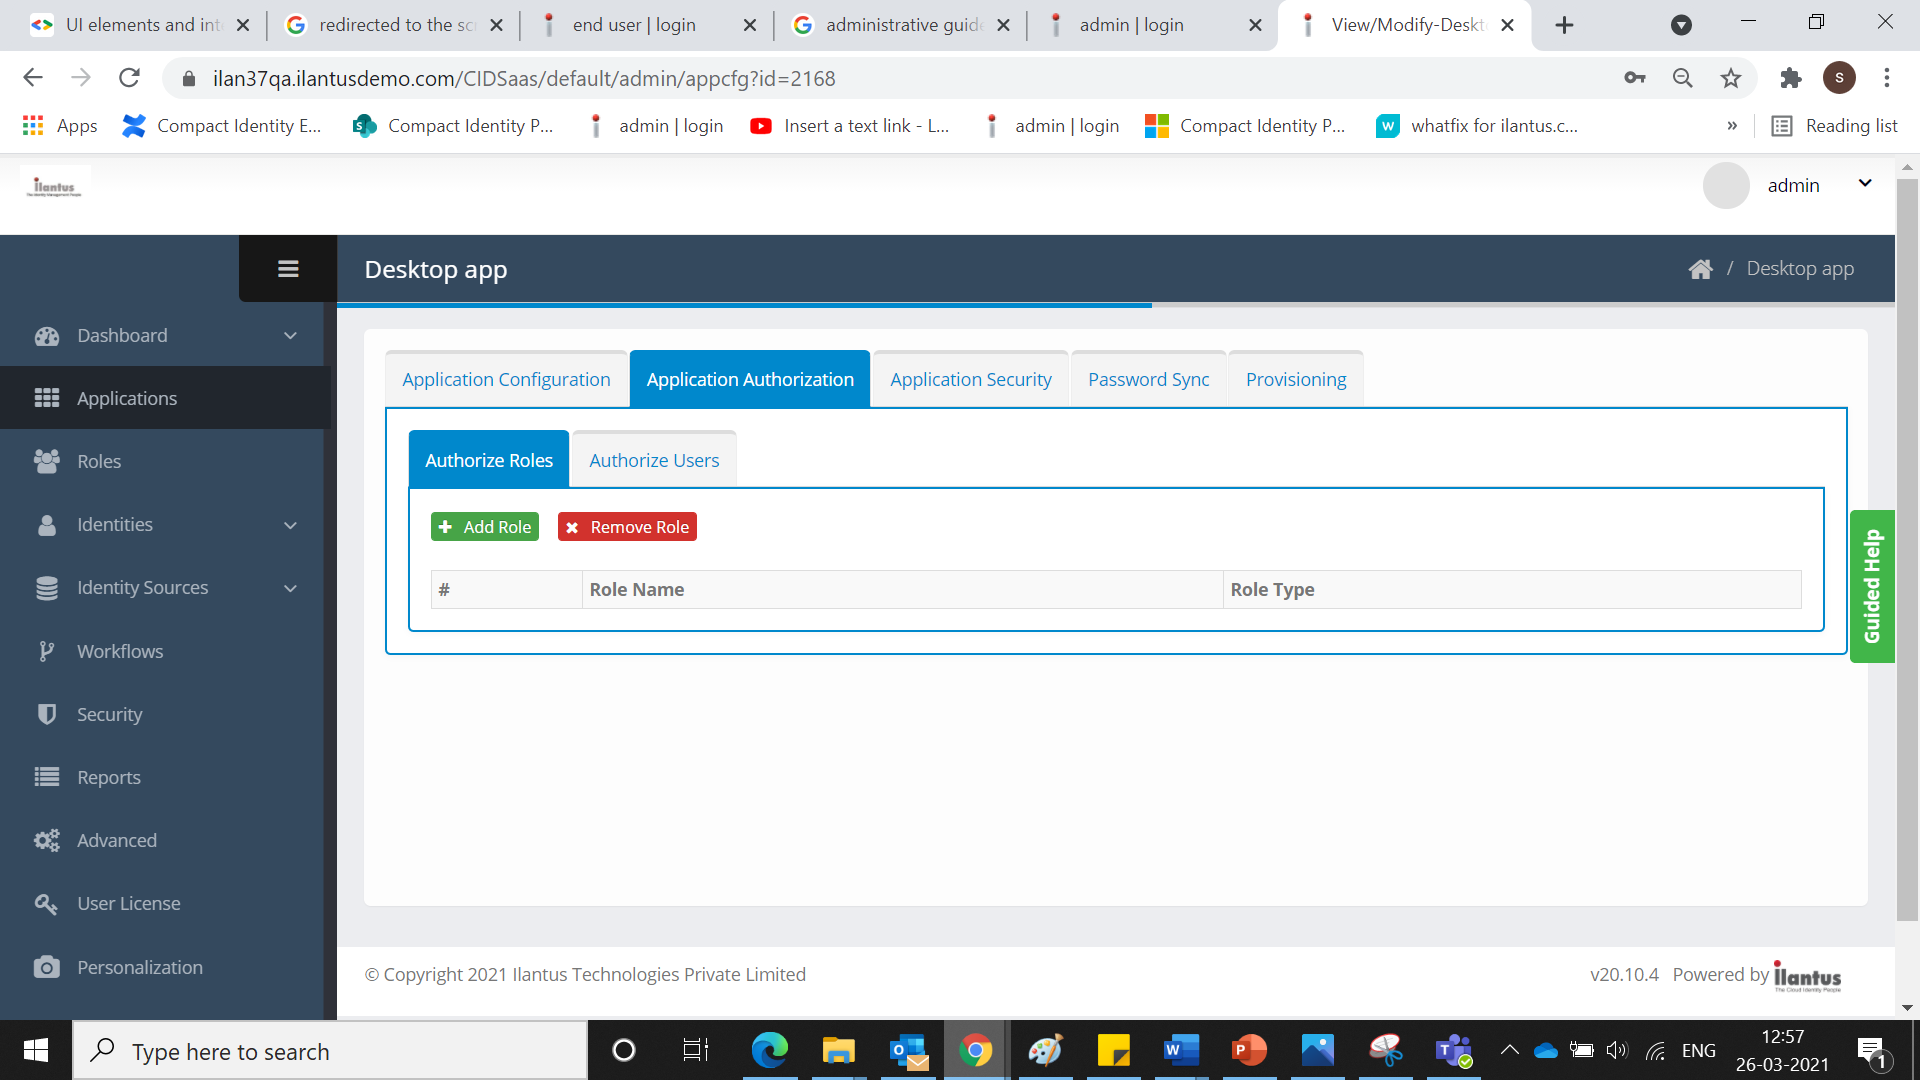
As an administrator, CI allows you to select specific roles that are authorized to access an application.
To authorize roles:
- Click Application. A pop-up option appears.
- Click Edit icon. The Application Configuration screen is displayed.
- Click Application Authorization tab. The Application Authorization screen is displayed.

- Click Authorized Role and click Add Role. The Add Role screen is displayed.

- Enter a Role Name.
- Click Add. The added role is displayed on the screen.
Authorize Users
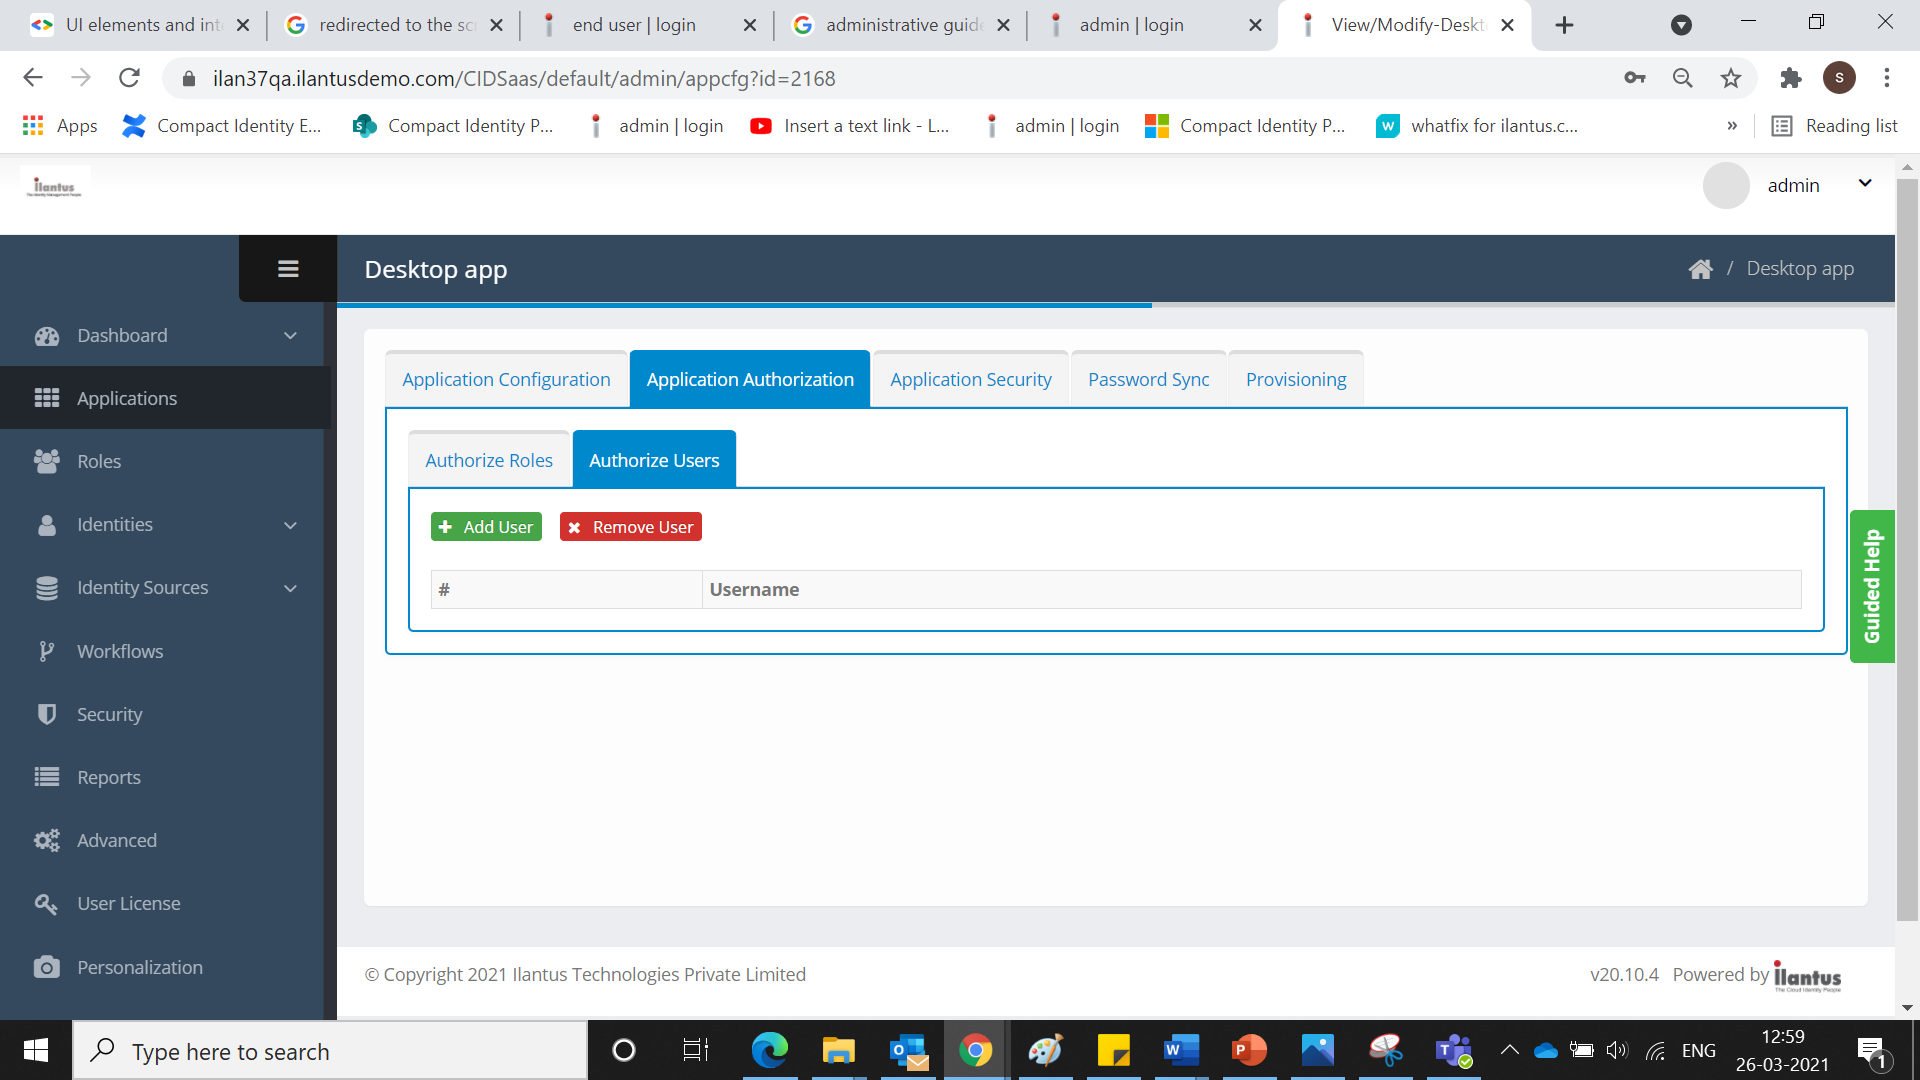
As an administrator, CI allows users to access each application.
To authorize users:
- Click Application. A pop-up option appears.
- Click Edit icon. The Application Configuration screen is displayed.
- Click Application Authorization tab. The Application Authorization screen is displayed.

- Click Authorized User and click Add User. The Add user screen is displayed.

- Enter a Username.
- Click Add. The added user is displayed on the screen.
Application Security
CI allows you to set up multi-level authorization to enhance security. All SSO applications can have an additional parameter defined by an administrator.
To set up multi-level authorization, perform the following steps:
- Click Application. A pop-up option appears.
- Click Edit icon. The Application Configuration screen is displayed.
- Click Application Security tab.

- Select Enable Step-up Authentication. The following options are displayed:
- Security Questions: The user must answer all the available security questions displayed on the screen.
- SMS OTP: Users will receive a one-time password on their registered mobile numbers. A Phone number will be dynamically derived from the user’s profile.
- Email OTP: Users will receive a one-time password on their registered email address. The Email address will be dynamically derived from the user’s profile.
- Soft Token: Six-digit one-time passcode will be generated on the Soft Token app on the user’s mobile number. The user needs to enter the passcode for verification.
- Click Save. A “Successfully updated application step-up authentication” confirmation message is displayed.
Password Sync
You can change an application password from your desktop or phone. As an Administrator, you can configure the users' CI password to synchronize with the other target IGA application during a password change or password reset. Suppose the IGA application has a corresponding Web SSO application configured. In that case, CI can ensure that the password of the SSO application in the password vault is updated during the Password Sync process.
To enable password sync:
- Click Application. A pop-up option appears.
- Click the Edit icon. The Application Configuration screen is displayed.
- Click the Password Sync tab.

- Select Enable password sync?.
- Click Save. A “Password sync setting updated successfully” confirmation message is displayed.
Provisioning
You can associate a provisioning application with each Web SSO application. If you have an owned account in the provisioning application, the SSO icon of the Thick-Client/Desktop application comes up on your SSO launchpad.
To associate the provisioning of an application:
- Click Application. A pop-up option appears.
- Click the Edit icon. The Application Configuration screen is displayed.
- Click the Provisioning tab.
- Select Associate a provisioning application?. Select the IGA application that is associated with the Provisioning Application from the drop-down list.

- Click Save. A “Successfully associated provisioning application” confirmation message is displayed.
.png)


.png)