- 30 Jan 2024
- 5 Minutes to read
- Print
- DarkLight
- PDF
SAML Application
- Updated on 30 Jan 2024
- 5 Minutes to read
- Print
- DarkLight
- PDF
Security Assertion Markup Language (SAML) application simplifies federated authentication and authorization processes for users, identity providers, and service providers. The identity provider authenticates the user's credentials and then returns the authorization for the user to the service provider. In addition, it allows users to use the application.
Configuring SAML Applications
To configure the SAML application:
- In the Applications home tab, click an Application. A pop-out menu option is displayed.

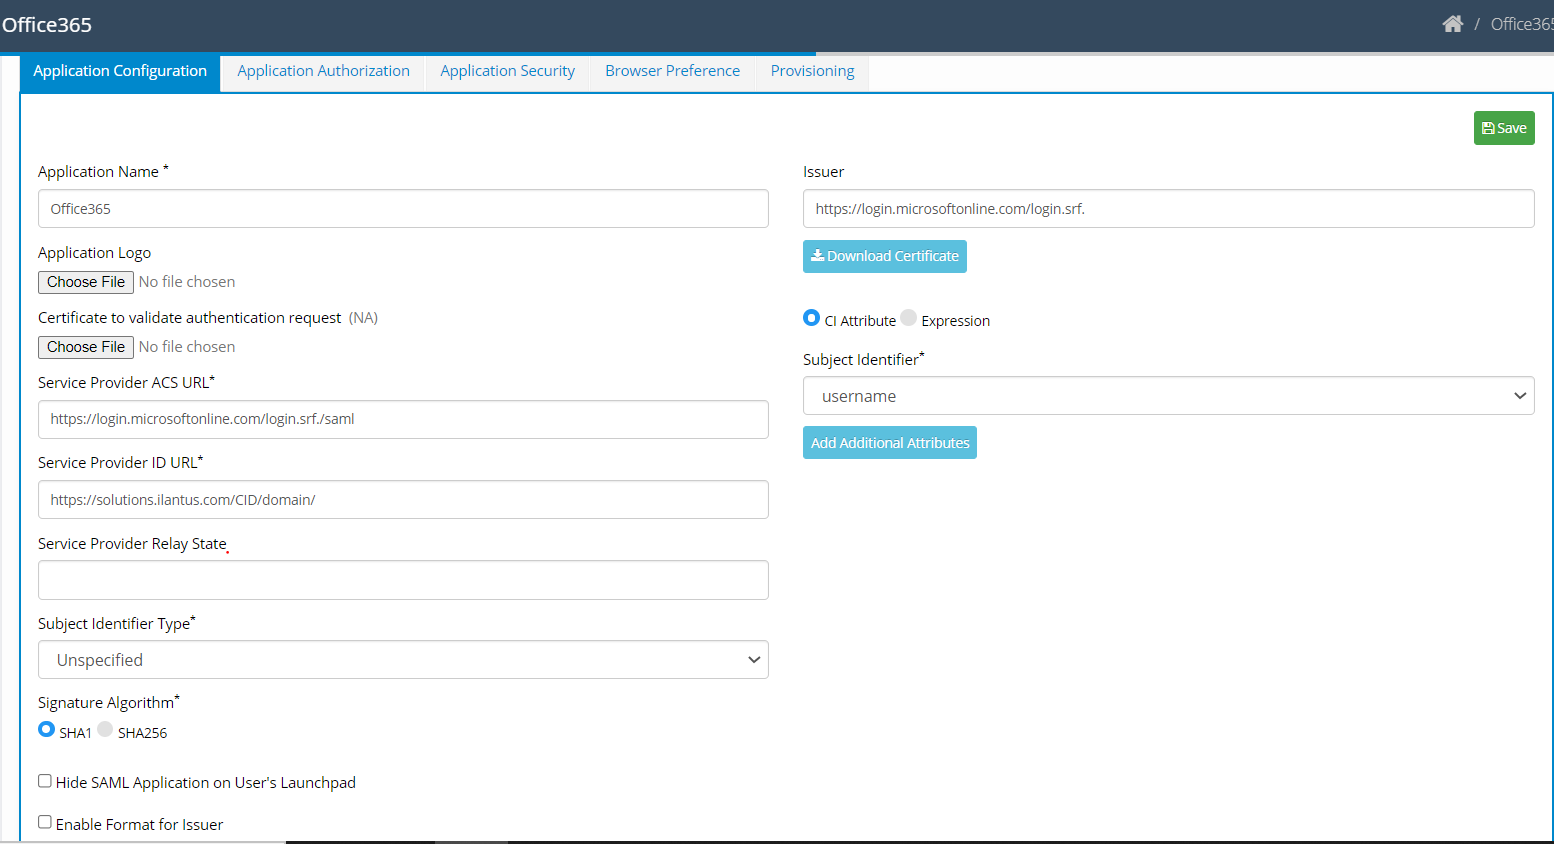
- Click Edit. The Application Configuration screen is displayed.

- Configure the application using the following:
- Application Name: Provide the application name.
- Application Logo: Select the application logo.
- Validation Certificate: Select the application certificate for validation.
- Service Provider ACS URL: Enter the Assertion Service Consumer URL.
- Service Provider ID URL: Enter the service provider ID URL.
- Service Provider Relay State: Enter an additional value or parameter to authenticate the user.
- Subject Identifier Type: Select the Identifier Type from drop-down options such as email id, entity, transient and unspecified. Email ID can be the default value.
- Signature Algorithm: Select the radio buttons.
If selected SHA1, that means the certificate is signed with SHA1.
If selected SHA256, that means the certificate is signed with SHA256.
- Hide SAML Application on User's Launchpad: Check the box, if you want to Hide SAML Application on user's Launchpad. By default, it is unchecked.
- Enable Format for Issuer: By default, it is unchecked. Check the box, if you want to enable the format for the issuer.
- Issuer: Enter the URL that identifies the SAML application provider.
- Download Certificate: Download the tenant-specific SAML IDP certificate that is enabled in Security>SAML IDP Details.
- CI Attribute: If selected, allows a user to select the drop-down option from the Subject Identifier.
- Expression: You can select to enter an expression as a Subject Identifier in this text box.
Example:
function getVal() {
var fname = this.getAttribute('firstName');
var lname = SAML.getAttribute('lastName');
return fname+'.'+lname;
}
The SAML additional attribute field accepts both the Cross Identity (CI) attribute value and the value of an expression.
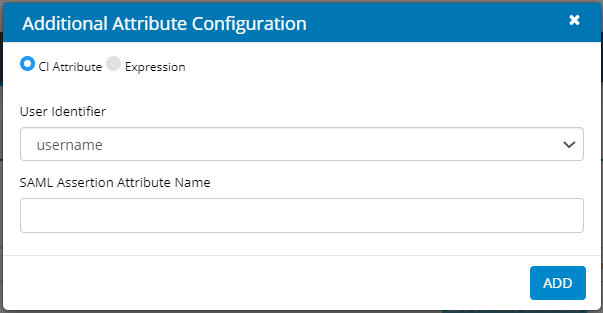
- Click Add Additional Attributes.
- Select CI Attribute, to allow the user to select User Identifier from the drop-down list.

- Select Expression, to allow a user to enter an expression in the text field.
For example:
Expression for Additional Attribute Configuration:
function getVal() {
if(USER.isAttrUnique('emailAddress',this.getAttribute('emailAddress')) == true) {
var fname = SAML.getAttribute('firstName');
var lname = ACCOUNT.getAttribute('lastName');
var newEmail = fname+'.'lname'@example.com';
return newEmail;
}
return SAML.getAttribute('emailAddress');
} - Enter SAML Assertion Attribute Name.
- Click Add.
- Click Save in the first screen. An “Application Updated Successfully” confirmation message is displayed.
- Click Close.
Sample SAML Configuration
This section provides step-by-step information about SAML SP initiated configuration where Salesforce acts as a service provider and CI as an identity provider.
SP Configuration
To configure the SAML (SP initiated) application for Salesforce, perform the following steps:
- Create a profile for the Salesforce application through Salesforce.com.
- Go to the home page of Salesforce and click on the setup icon.
- Search for MY Domain, click on Edit and Enable.
- Enter any Domain Name and Save.
- Search for Single Sign-On settings.
- Enable the SAML-enabled checkbox.
- Click on New.
- Enter the instance/application name. For example, DevTest.
Provides values for the following parameters:- Issuer-DevtestSAML (Take it from the SAML application from the CID application which should be unique)
- Entity ID-https://devtest.lightning.force.com (take Domain URL-copy it from the URL of the same tab. For Example, https://devtest.lightning.force.com)
- Identity Provider Certificate-(Download it from the SAML application and upload it here)
- Select "HTTP Redirect" in front of the Service Provider Initiated Request Binding
- Identity Provider Login URL
https://test2.Crossdemo.com/CIDSaas/default/user/spsso
Steps for Login URL- Login as admin.
- Go into the Security > SAML IDP details.
- Enter IDP SSO URL
- Custom Logout URL
https://test2.Crossdemo.com/CIDSaas/default/user/slo
Steps for Logout URL:- Login as admin
- Go into the Security > SAML IDP details.
- Enter IDP SLO URL
- Click Save.
- Download the Metadata file.
- Go to My Domain > click on Edit > Authentication service.
- Disable the Login form.
- Enable domain name (The name you have entered appears).
IDP Configuration
To configure the SAML application in CI as IDP, perform the following steps:
- Go to Admin login.
- Click on the SAML application icon and select Edit.
Provide values for the following parameters:- Issuer Name: Provide a unique issuer name.
- Service Provider ID URL: Provide Entity ID from the metadata file (Step 10).
- Service Provider ACS URL: Provide the Location from the metadata file.
- Click Save.
- Create a user schema attribute 'SamlEmail' through Admin> Advance> User Schema attribute.
- Select the SamlEmail attribute in the subject identifier of the SAML Application.
- Create a user through Admin> Identities.
- Update the username of the Salesforce application into the SamlEmail attributes of a user (the Username gets created when you create a profile in the Salesforce application and receive it through email/personal details).
Using the SP Initiated flow for CI as IDP
SSO Flow
- Log in with the configured end-user.
- Go to the Launchpad.
- Launch SAML application (Salesforce)
SP Initiated Flow
- Go to the Service Provider ID URL. An end-user Login page appears.
- Log in with the configured end-user.
Application Authorization
An Administrator allows you to create users and roles. You can perform the following:
- Authorize Roles
- Authorize Users
Authorize Roles
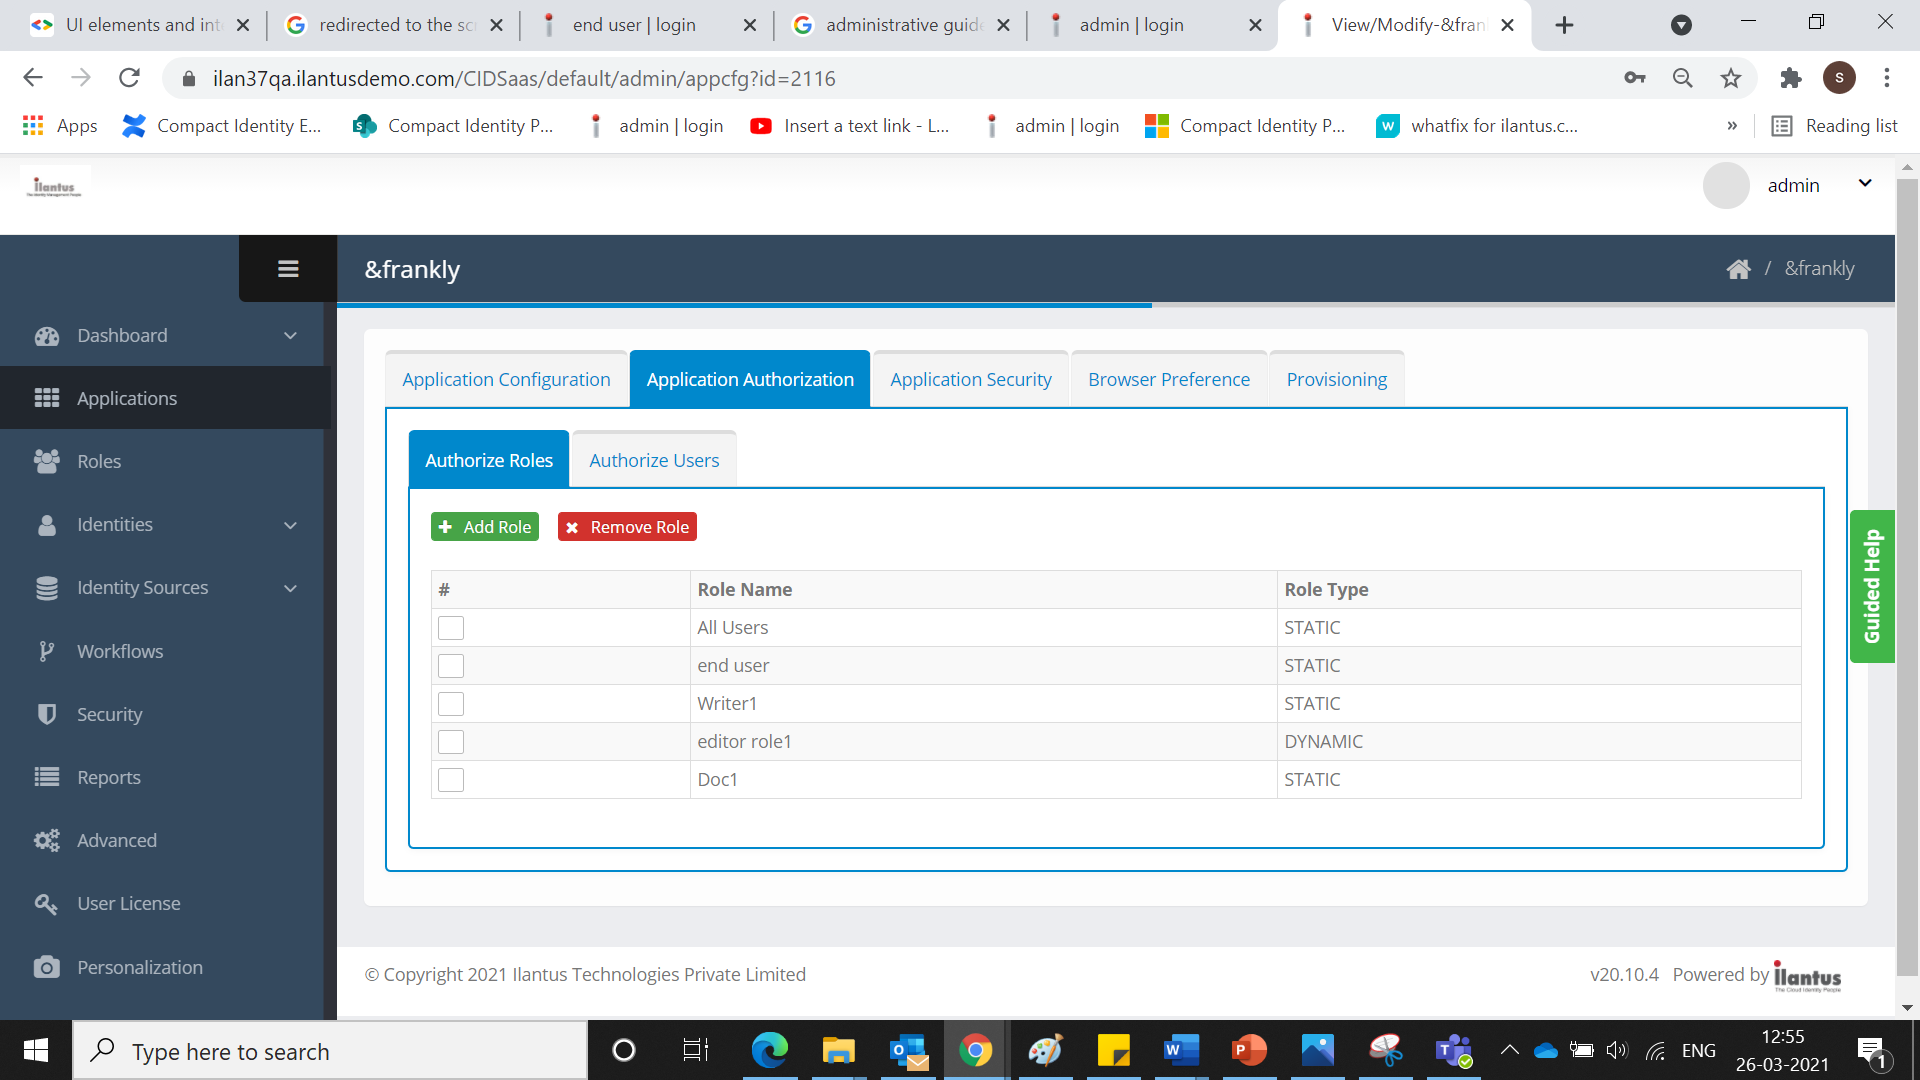
As an administrator, CI allows you to select specific roles that are authorized to access an application.
To authorize roles:
- Click Application. A pop-up option appears.
- Click Edit icon. The Application Configuration screen is displayed.
- Click Application Authorization tab. The Application Authorization screen is displayed.

- Click Authorized Role and click Add Role. The Add Role screen is displayed.

- Enter a Role Name.
- Click Add. The added role is displayed on the screen.
Authorize Users
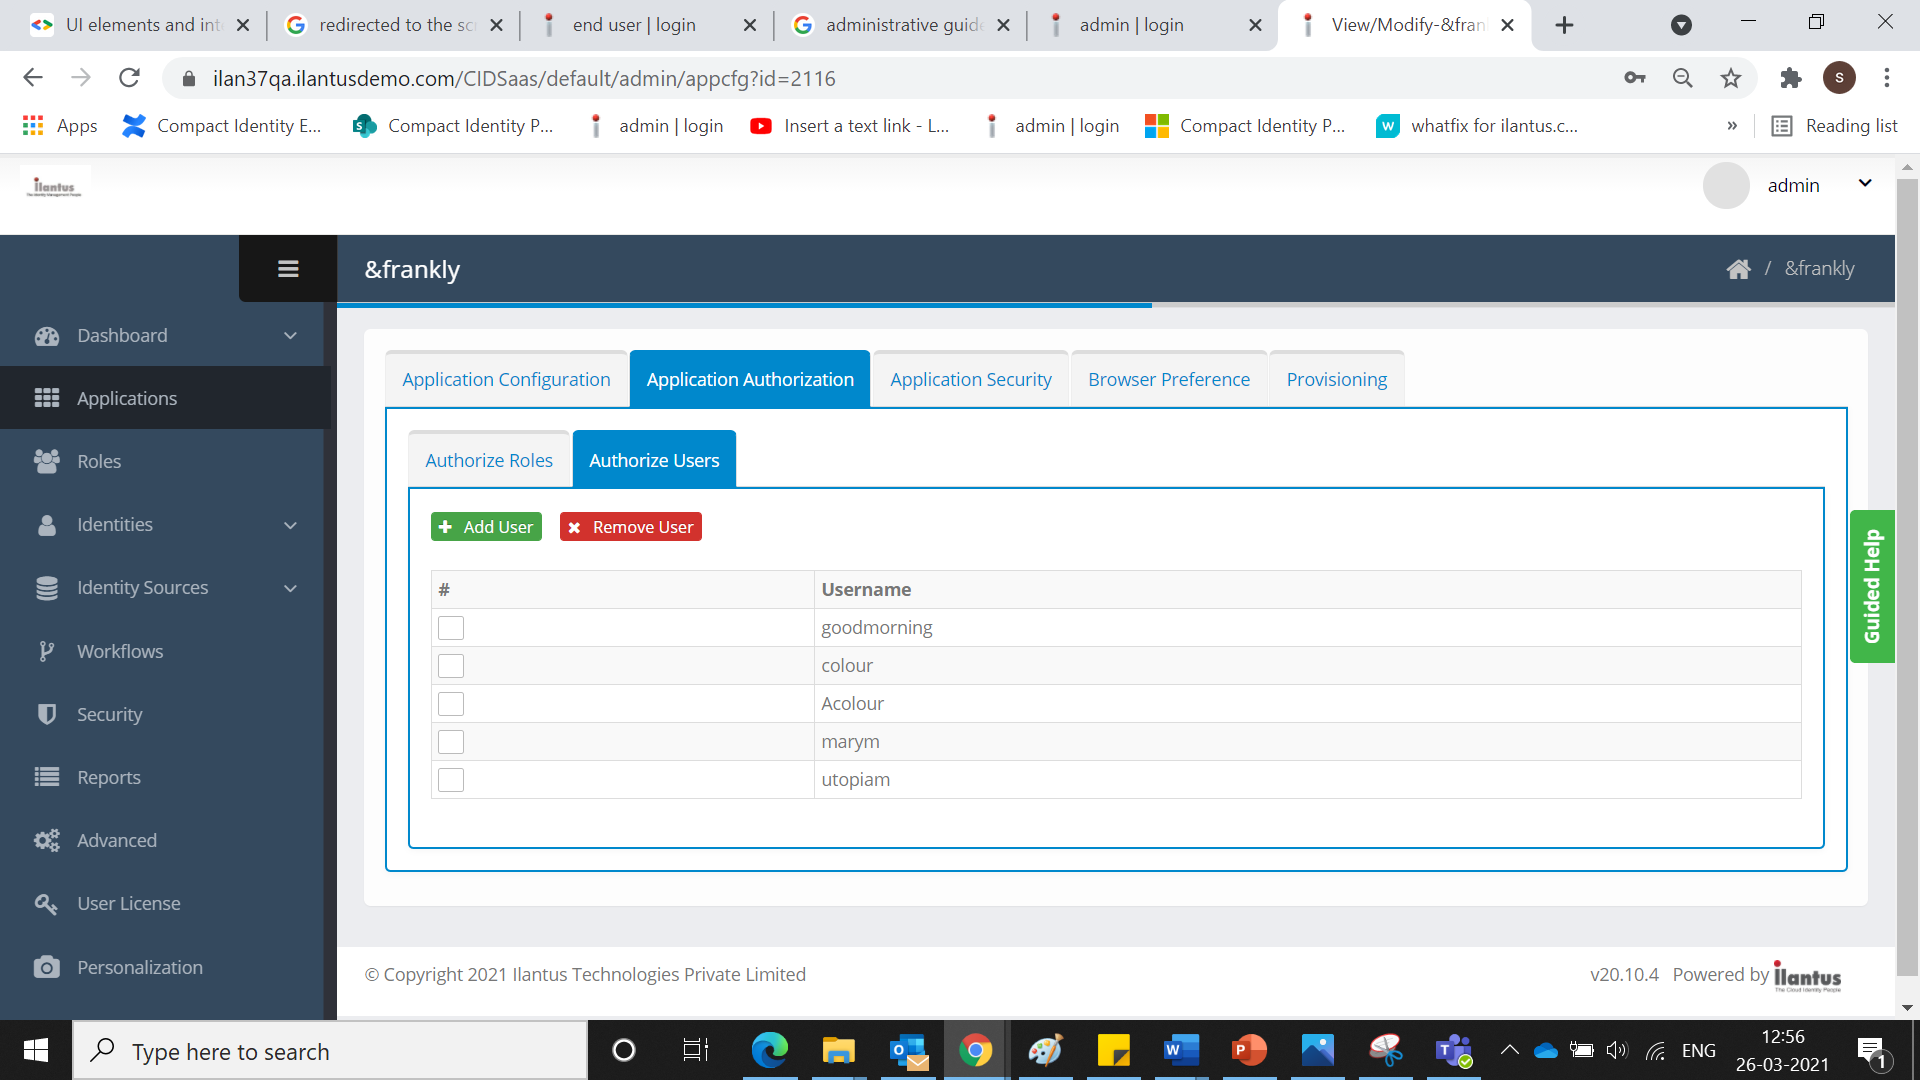
As an administrator, CI allows users to access each application.
To authorize users:
- Click Application. A pop-up option appears.
- Click Edit icon. The Application Configuration screen is displayed.
- Click Application Authorization tab. The Application Authorization screen is displayed.

- Click Authorized User and click Add User. The Add user screen is displayed.

- Enter a Username.
- Click Add. The added user is displayed on the screen.
Application Security
CI allows you to set up multi-level authorization to enhance security. All SSO applications can have an additional parameter defined by an administrator.
To set up multi-level authorization, perform the following steps:
- Click Application. A pop-up option appears.
- Click the Edit icon. The SAML Application screen is displayed.
- Click the Application Security tab.
- Select Enable Step-up Authentication. The following options are displayed:
- Security Questions: The user must answer all the available security questions that are displayed on the screen.
- SMS OTP: Users will receive a one-time password on their registered mobile numbers. A phone number is dynamically derived from the user’s profile.
- Email OTP: Users will receive a one-time password on their registered email address. The email address will be dynamically derived from the user’s profile.
- Soft Token: Six-digit one-time passcode will be generated on the Soft Token app on the user’s mobile number. The user needs to enter the passcode for verification.
- Click Save. A “Successfully updated application step-up authentication” confirmation message is displayed.
Browser Preference
You can enable your choice of browser in the browser’s preference for the web application.
To select browser preference, perform the following steps:
- Click Application. A pop-up option appears.
- Click the Edit icon. The SAML Application screen is displayed.
- Click the Browser Preference tab.

- Click Enable browser preference. The following list of browsers appears for a user to select the preference:
- Firefox
- Internet Explorer
- Chrome
- Select your preferred browser to assign a browser to the application.
- Click Save.
Provisioning
You can associate a provisioning application with each Web SSO application. If you have an owned account in the provisioning application, the SSO icon of the web application comes up on your SSO launchpad.
To associate the provisioning of an application, perform the following steps:
- Click Application. A pop-up option appears.
- Click the Edit icon. The SAML Application screen is displayed.
- Click the Provisioning tab.

- Select Associate a provisioning application. Select the IGA application that is associated with the Provisioning Application from the drop-down list.
- Click Save. A “Successfully associated provisioning application” confirmation message is displayed.
.png)


.png)