Configure SAML application
- 13 Feb 2025
- 4 Minutes to read
- Print
- DarkLight
- PDF
Configure SAML application
- Updated on 13 Feb 2025
- 4 Minutes to read
- Print
- DarkLight
- PDF
Article summary
Did you find this summary helpful?
Thank you for your feedback
Security Assertion Markup Language (SAML) application simplifies federated authentication and authorization processes for users, identity and service providers. The identity provider authenticates the user's credentials and returns the authorization for the user to the service provider.
Configure a SAML application
Navigate to Applications from the menu. Click + Add Application.

In the AppStore pane, click SAML to view SAML applications. Example- Salesforce.
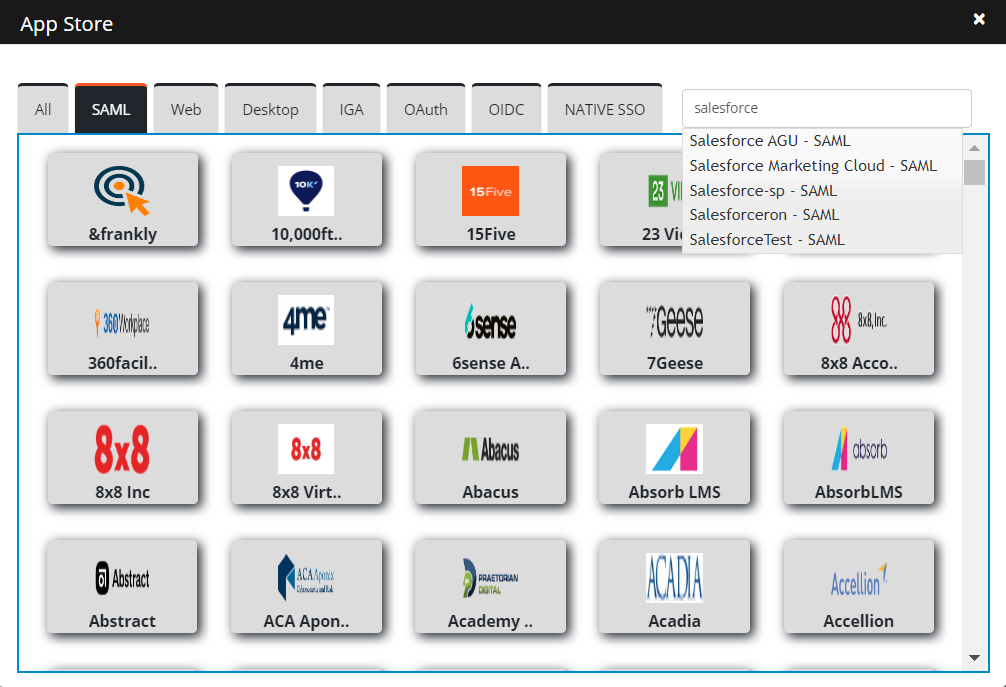
Select the application and it will take you to the Application Configuration page.

Enter the following details:


Import SP metadata: The administrator can import the Service Provider (SP) metadata into the application configuration instead of manually filling in the required fields.
Click Import SPmetadata.
Upload the file in XML format. The file must contain the Service Provider ACS URL, Service Provider ID URL and sometimes Issuer.
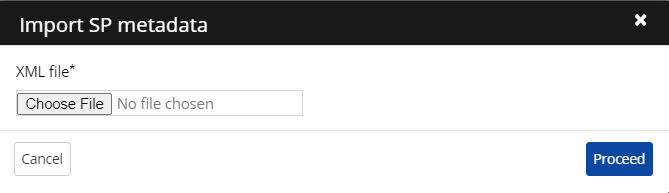
Click Proceed.
Application Name: It is a pre-filled field. You can edit the application’s name if you wish.
Application Logo: Upload the application logo.
Validation Certificate: Upload the application certificate to validate provided by SP.
Service Provider ACS URL: Enter the Assertion Service Consumer URL provided by SP.
Service Provider ID URL: Enter the service provider ID URL.
Service Provider Relay State: Enter an additional value or parameter to authenticate the user.
Subject Identifier Type: This is how SAML applications authenticate a user based on their attribute.
Signature Algorithm: The secured hashing algorithm enables more security as they’re used to encrypt and secure Signed Certificates.
SHA 1: Uses 160 Bit value
SHA 256: Uses 256 Bit value for encryption (Recommended)
Information:
If you are unsure which option to choose, please ask your SAML service provider.
Hide SAML Application on the User’s Launchpad Checkbox: Hides the SAML application from the end user's Launchpad.
Enable format for the issuer: The service provider's Entity ID (unique identifier).
Sign SAML Response: Check the box if you wish to sign the response received from the target application.
Sign SAML Assertion: Check the box if you wish to sign the SAML assertion.
Issuer: Enter the URL that identifies the SAML application provider.
Download Certificate: Download the tenant-specific SAML IDP certificate enabled in Security>SAML IDP Details.
CI Attribute: If selected, allow a user to select the drop-down option from the Subject Identifier.
Expression: You can select to enter an expression as a Subject Identifier in the text box.
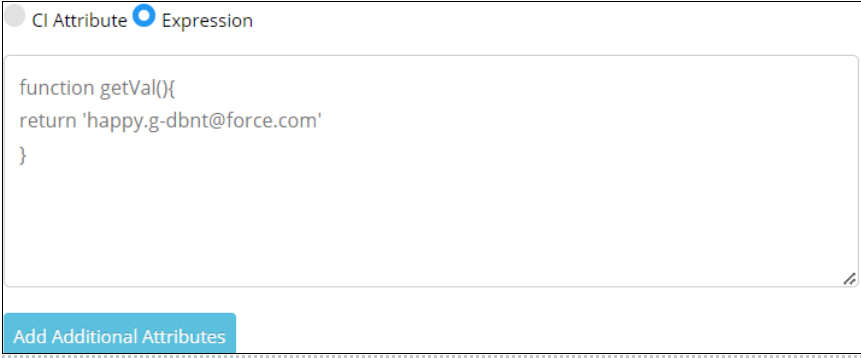
Example:
function getVal() {
var fname = this.getAttribute('firstName');
var lname = SAML.getAttribute('lastName');
return fname+'.'+lname;
}Add additional attributes: Follow the below steps to add:


Information: The SAML additional attribute field accepts both the CrossIdentity (CI) attribute value and the value of an expression.
Click Add Additional Attributes.
Select CI Attribute to allow the user to select User Identifier from the drop-down list.
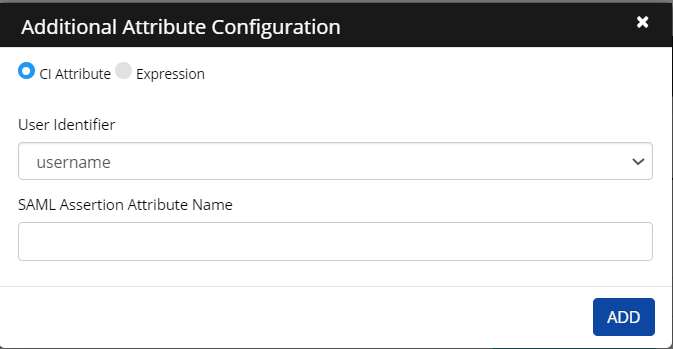
Select Expression to allow users to enter an expression in the text field.
For example:
Expression for Additional Attribute Configuration:
function getVal() {if(USER.isAttrUnique('emailAddress',this.getAttribute('emailAddress')) == true) {
var fname = SAML.getAttribute('firstName');
var lname = ACCOUNT.getAttribute('lastName');
var newEmail = fname+'.'lname'@example.com';
return newEmail;
}
return SAML.getAttribute('emailAddress');
}
Enter the SAML Assertion Attribute Name.
Click Add.
Click Save on the first screen. An "Application Updated Successfully" confirmation message is displayed.
Click Close.

Application Authorization
An Administrator can authorize the application to respective users and roles.
Authorize Roles
As an administrator, CI allows you to select specific roles authorized to access an application.
To authorize roles:
Navigate to Application Authorization. The application authorization screen is displayed.

Click Authorize Role > Add Role. The Add Role screen is displayed.
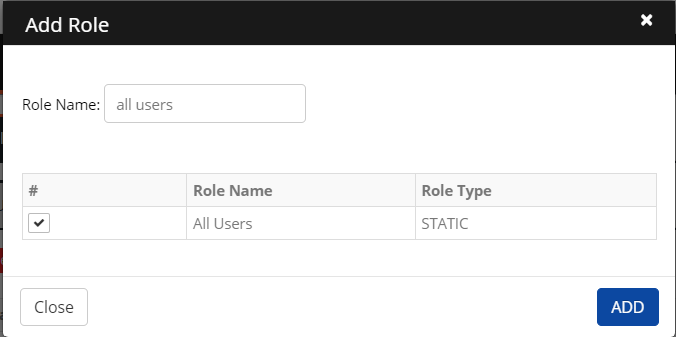
Enter a Role Name in the search field.
Select a role from the results and then click Add.
The added role is displayed on the screen.
Information:
Based on the role type, it allows the user to select either static or dynamic.


Authorize Users
As an administrator, CI allows only specific users to access an application.
To authorize users, perform the following steps:
Click Authorize Users > Add User.

Enter a username in the search field.
Select a user from the results and then click Add.

The added user is displayed on the screen.

Note:
You can remove users from the Remove User tab.


Browser Preference
You can enable the choice of browser for the web application.
To select browser preference, follow the steps:
Navigate to Browser Preference.

Check the box Enable browser preference. The list of browsers appears for a user to select from:
Firefox
Internet Explorer
Chrome
Microsoft Edge

Select the preferred browser to assign a browser to the application.
Click Save.


License
This applies to the pay-per-use model, where the admins can assign a specific number of licenses for use in SSO. This prevents over-utilization of the application.
Navigate to License.
Max. User Licenses: Enter the maximum number of licenses which can be issued to the application.
Application License Price: Enter the price for each license to calculate the total cost and it is displayed on the Consumption Dashboard.


3. Click Save.
Provisioning
You can associate a provisioning application with each Web SSO application. If you have an owned account in the provisioning application, the SSO icon of the web application comes up on your SSO launchpad.
To associate the provisioning of an application, follow the following steps:
Navigate to Provisioning.

Check the box Associate a provisioning application. Select the IGA application associated with the Provisioning Application from the drop-down.

Click Save. A “Successfully associated provisioning application” confirmation message is displayed.


Bookmark URL
It is an auto-generated one-of-a-kind application URL issued by Cross Identity. This URL allows an end user to bypass the Launchpad and directly enter it into a web browser to access the application.
An admin needs to provide the URL to an end user by email.
Session Recording
Session recording is implemented to enable administrators to track and audit privileged user activities, ensuring compliance with regulatory standards and enhancing security measures.
Click Enable Session Recording and then Save.


Was this article helpful?
.png)